Happy New Year everyone!! I’m so thrilled to be hosting a fabulously fun sew-along in our Facebook Group. Plus there are give-aways here on the blog and in our group. Come join us!!

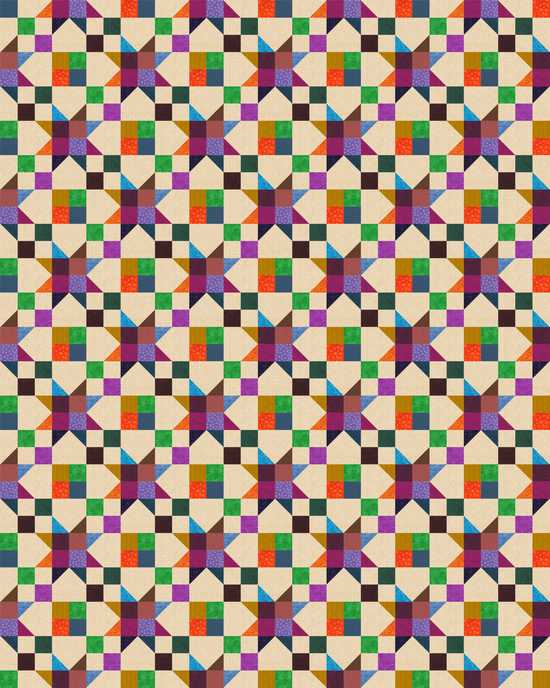
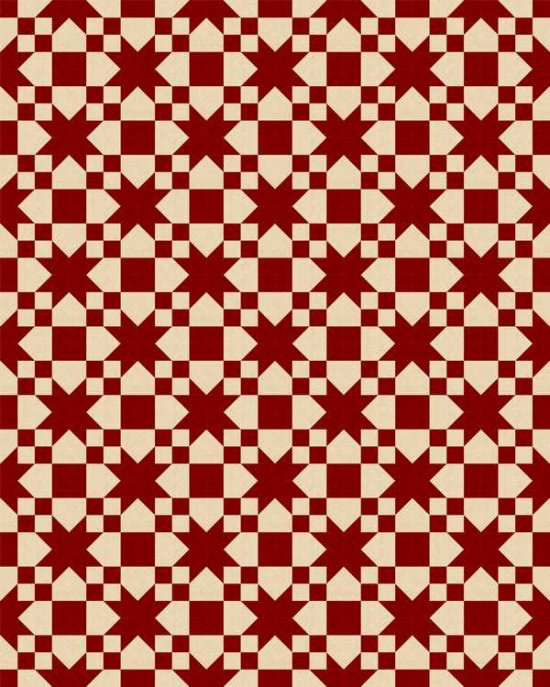
Here’s the FREE quilt that I’m teaching … Bright Stars (thanks to Jill McL for the name suggestion). The quilt as presented finishes at 64″ x 80″.
A scrappy version …
… and a two-colour version.
This is a Sew-Along … which means I’m sewing WITH you … and writing up the tutorial as we go along.
Fabric Requirements
You’ll need approximately 3.5 yards of BOTH light and dark fabrics to complete the top as shown above. If I decide to add borders, I’ll share that info later. Backing, batting and binding will be added later.
You can use scraps (or charms), fat quarters or yardage. IF you have an Easy Angle or Easy Star and Geese Ruler, you can use jelly rolls. If you don’t have these speciality rulers, you can’t use jelly rolls for the half-square triangles.
Let’s get started!
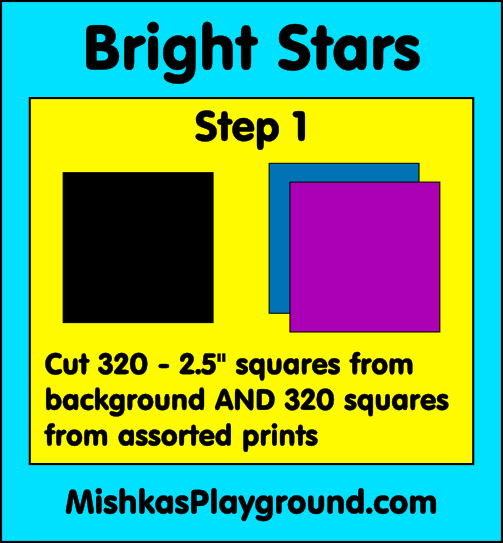
Important note: In my tutorial diagrams, the black units represent the background fabric.
WAIT! Before you cut, read the next step and additional notes.
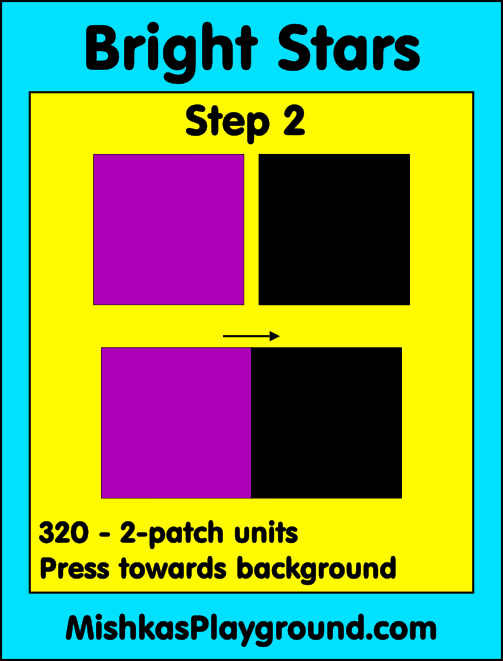
Additional Notes: Instead of cutting individual squares, you may wish to use 2.5″ strips, sew the strips together, one background, one print, and then sub-cut those strip sets into the 2-patch units.
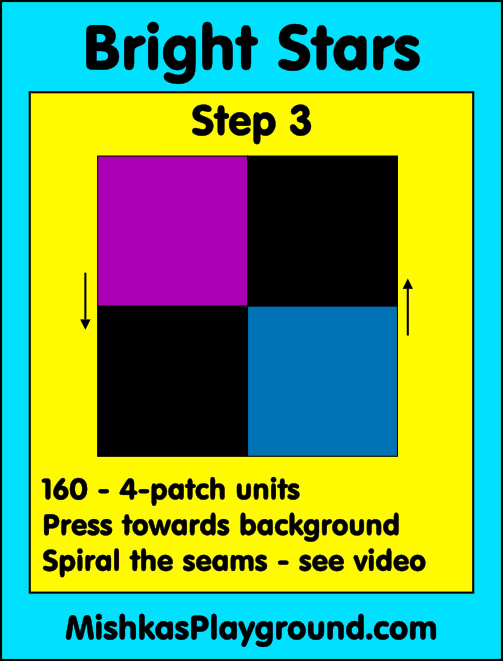
Important UPDATE: If you have not started your first batch of four-patches (i.e. Steps 1 to 3) … I strongly recommend that you shorten your stitch length a bit and instead of pressing to the background fabric, press your seams open. This will make future steps a little easier. However, like many of you, I’ve already done a good bit of my four-patches, so I’ll make it work having already pressed them in the direction indicated. It’s not a HUGE deal, we just can’t nest the seams for this quilt top as well as I thought we would be able to.
Spiral the Seams: If you’ve done any of my other quilt patterns, you’ll know how much I love spiralled seams for 4-patch units. By doing this, you distribute the bulk evenly. If this is a new term to you, watch this video:
Time for some more cutting….
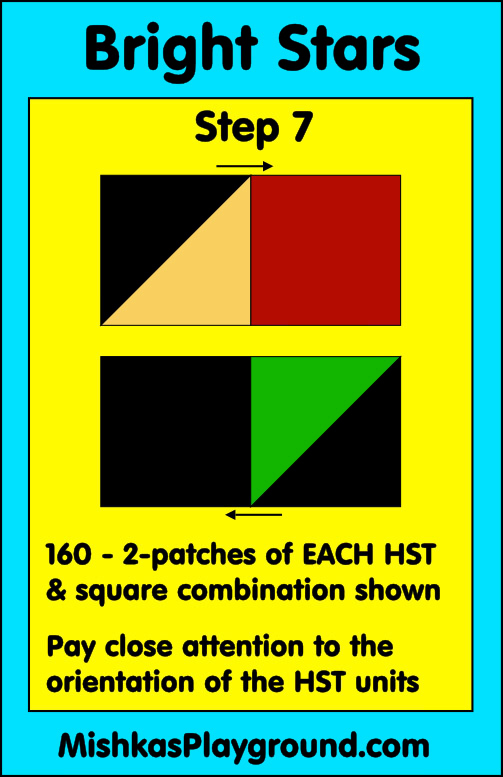
Now it’s time to cut the fabric to make a total of 320 half-square triangle (HST) units.
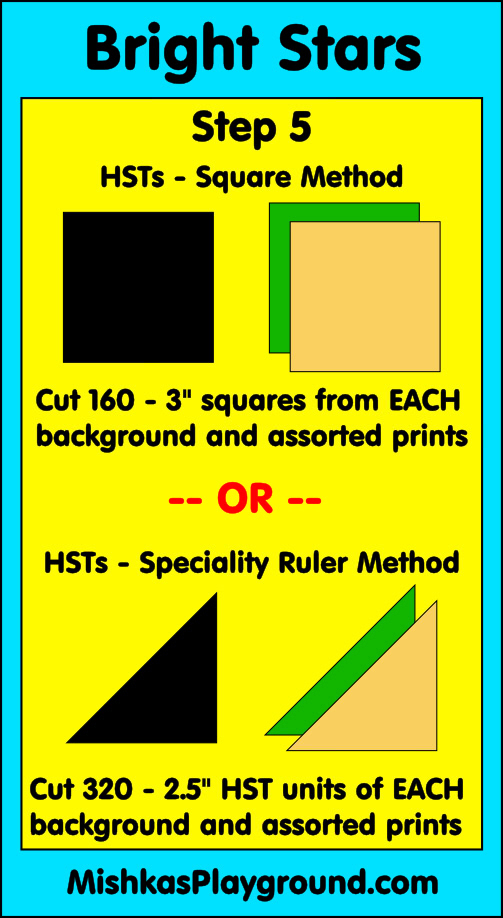
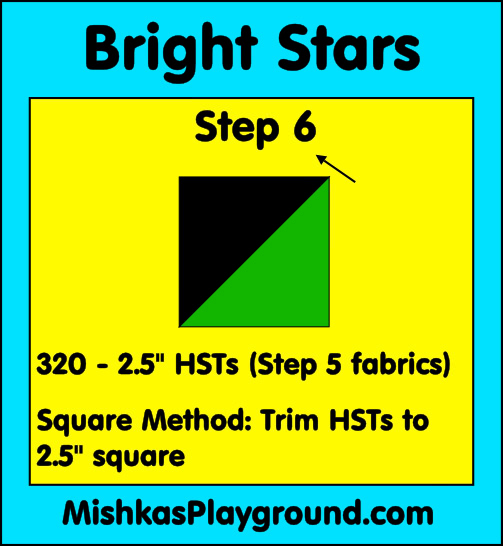
I have given you the cutting instructions for two options of making the HST units. The first is the Square Method, where you’ll start with large squares, draw a diagonal line, stitch on both sides of the line, cut apart to yield two HST units and TRIM the HST units to the correct size. The second method is for using one of the Speciality Rulers, such as the Easy Star & Geese or Easy Angle rulers.
See this Tutorial: Creating Triangle and Flying Geese Units
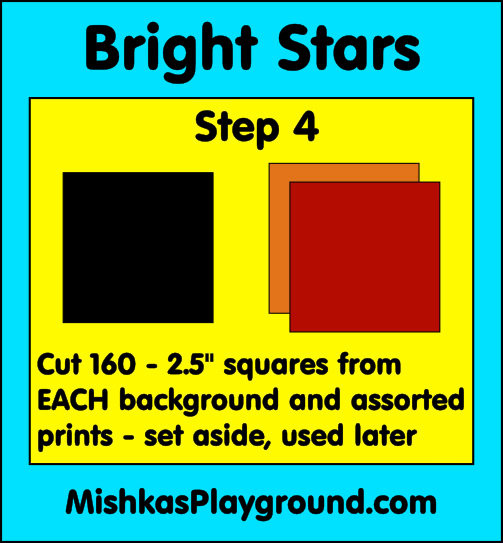
Remember those squares you cut in Step 4, now it’s time to combine them with the HST units you’ve completed in Step 6.
Almost at the finish line, with Step 8 … press your new four-patches by spiralling the seams or pressing open. It’s really up to you. They won’t nest nicely when we join the blocks no matter what you choose.

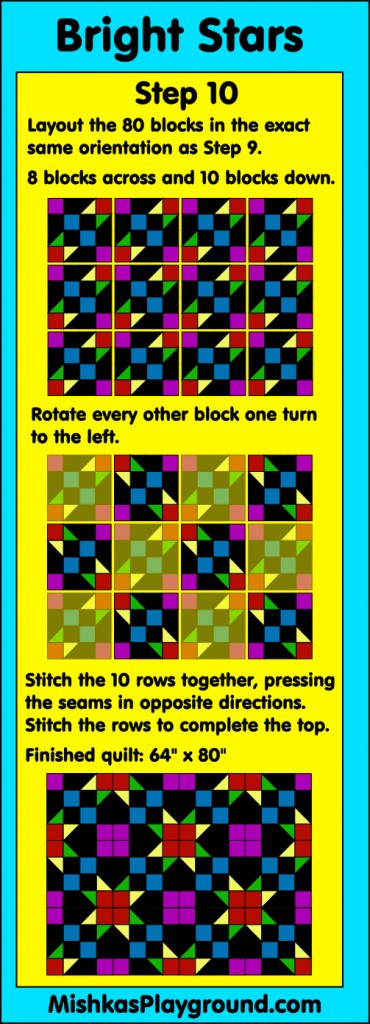
Now take the two sets of 160 four-patches and create, yet another four-patch .. we’re getting bigger. Layout each individual block, so that you are 100% sure that you have the orientation correct. This is the completed block and measures 8.5″ square.

Let’s put the top together …
Give-Aways
This sew-along has come together very quickly, but I did manage to get some free PDF patterns from friends to use as give-aways. Some of the patterns are being given away in our Facebook Group. However, I wanted to make it fair to everyone in all time zones, so you can enter on this blog post too!
To enter: Simply leave a comment below answering the following: “Have you made any New Year’s Resolutions? If so, what are they?” I’ll choose the winners randomly, next Monday, January 5, 2015.
Thanks so much to the generosity of friends and sponsors that have donated .. at the last minute! Here are the prizes:
My dear friend, Pat Sloan, has donated THREE copies of her Let’s GO Sew pattern.
The three winners chosen from our Facebook Group are:
- Peggy McC.
- Deborah D.
- Amy D.
Our friends at the Fat Quarter Shop have donated THREE of their It’s Sew Emma PDF patterns (max. value of $9.00).
The three winners chosen from our Facebook Group are:
- Linda G.
- Connie G.
- Barb C.
Quilting buddy, Amy from Butterfly Angels Quilting has donated six copies of her pattern. Winners can choose between:
Cross Cross Apple Sauce:

Cajun Cathedral Windows:

The six winners chosen from our Facebook Group are:
- Maggie F.
- Diana F.
- Kay M.
- Susan J.
- Liz G.
- Danielle W.
I donated three copies of my latest pattern, Little Gems Mug Rugs.

The three winners chosen from our Facebook Group are:
- Lucy W.
- Roberta J.
- Susan N. W.
I too am looking for step 10. Wanted to get all the steps printed because i haven’t been able to start until now. But without all the directions i may not start it at all. Where is Michele Foster??
UPDATED: Step 10 was posted here last night … I can’t update the web site right now .. but hopefully I can tomorrow .. here it is again:
For those that have completed Step 9 … and finished the actual block .. you need 80 of them. Layout your quilt top in the orientation presented for Step 9. 8 blocks across by 10 blocks down. Then just ROTATE every other block one turn to the left. Voila! You’ll start to see the star design.
*******
I have absolutely LOVED this project. fast and gorgeous!! thank you thank you.
I have checked this spot out at least 10 times every day since the 2nd and have not seen the directions for step 10. Where can I go to find them?
Where is the PDF file?
Did you ever get step 10 to post? Haven’t seen anything new on your blog since step 9. Even when it’s refreshed. Hope all is well and it’s nothing bad keeping you away. Thanks…really liking the pattern. Sue
Can’t find Step 10 or an updated post. Sure is a Mystery!
I too cannot find step 10. When I go to the site it tells me that it will be posted Jan. 2
I too would like one full pattern and instructions before even starting this project. Does anyone have them yet? 1/11/15 That can lead me to them?
Ohhhh… I’m so sorry everyone. The web server failed yet again .. and they FINALLY just got it fixed right now so I can use it.
Step 10 had been posted in the Facebook group. I’ll get it posted here soon, along with the download PDF.
Sorry for not responding to your messages, I wasn’t receiving any notification of them, and didn’t even know you’d left messages on here.
A crazy start to the New Year for me.
Cheers,
Michele
Is there a PDF for this quilt that can be printed out? Did I miss it?
Has the PDF every been posted for this?
Did I miss the PDF for this quilt? I would like to print it out. Thanks