
The Aiming for Accuracy quilt-along (QAL) was held in the Summer/early Fall of 2013. The lessons, blocks and detailed photo tutorials have been removed from this site and are now available for sale as a complete booklet.
Find out more about it here: Aiming for Accuracy Booklet.

Welcome everyone to our first official lesson for the Aiming for Accuracy Quilt-Along (A4AQAL). If you’re new here, please be sure to check out the main QAL page where you’ll find all the information you need including the fabric requirements, colour charts, recommended products and getting started information, along with the cutting instructions for your background/contrast fabric.
Going forward, generally, here’s how the quilt-along will work. Every Thursday for the next 16 weeks, there will be a weekly lesson available on the Quilting Gallery site, for free, by noon EDT. I’ll do my best to get the posts up by noon, but please do keep in mind that sometimes life and urgent client work gets in the way.
For the first several lessons, in addition to the block/unit tutorial for our quilt, I’ll be sharing other resources and opinions on perfecting your quilting accuracy. I’ll monitor the progress and questions I receive as we go forward to plan future lessons.
We will have weekly prizes that everyone can enter. Amy Gay of Butterfly Angels Quilting has volunteered to be Prize Coordinator and will be communicating with the winners and sponsors. For the first 12 weekly lessons, we have five or six prizes to give-away each week.
To enter the weekly give-aways: Each Saturday, there will be a blog post available on the Quilting Gallery site, where you will upload your completed photo for that week’s lesson. Check the main QAL page for the link. You’ll have until the following Friday evening to enter. Amy will be choosing the week’s winners on Saturday morning.
UPDATED: However, because of the long weekend up here (Canada Day) and the US 4th of July later next week, the submissions dates and due dates will be different for this lesson. You’ll be able to upload your photos late on Tuesday, July 2nd and you’ll have until Sunday, July 7th at midnight. Amy will pick the winners on July 8th.
You will be able to play catch-up and share your photos after the due date. You just won’t be eligible for that week’s prizes after the due date.
We are chatting up a storm in our Facebook Group and you can also share photos in our Flickr Group. We have a #hashtag too, #a4aqal, which can be used on Facebook, Twitter and Instagram.
Please note: Even if you share photos on other social media sites or your own blog, to be eligible to win one of the give-aways, you still need to upload the photo on this site.
Let’s get started…
Quilting Accuracy: Pressing Seams
For this week’s lesson, I’ll be sharing some resources for pressing your seams while piecing. In the individual block tutorials, I will not be sharing how to press your seams.
There is a debate on when to press seams to one side and when to press them open. Here’s my take, until recently, I always pressed my seams to one side, never open, so that I could nest the seams during block construction. However, I’ve recently changed my mind about this and for some smaller projects I’ve been working on, I’ve been pressing seams open to see how I liked that as an option. For my 1930s QAL test version, I pressed in my old fashion way, towards one side. I’m not as happy with the results, too much bulk at the points. As such, this quilt will be my first large test of pressing all seams open.
I’m not going to suggest that you follow my example, because frankly, I don’t know yet if I’ll like it or recommend it. Since I’ll be hand-quilting this quilt with big stitch quilting, 1/4″ away from all seams, less bulk will certainly help me do that.
You decide what you want to do!
Here are a few links for you to explore more about this topic:
- Mabry Benson’s Why You should Press Your Quilt Seams Open
- Leah Day’s Pressing Seams
- Weeks Ringle’s The whys and hows of pressing seams open
- Sew, Mama, Sew’s Quilting Basics ~ The Quarter Inch Seam & Pressing Techniques and Matching Seams
- Jackie’s Seams… The Burning Question… Press Open or To One Side?
If you’re going to press your seams to one side, and don’t feel bad if this is your decision as I did it for years, here are a couple of things to keep in mind as we go forward.
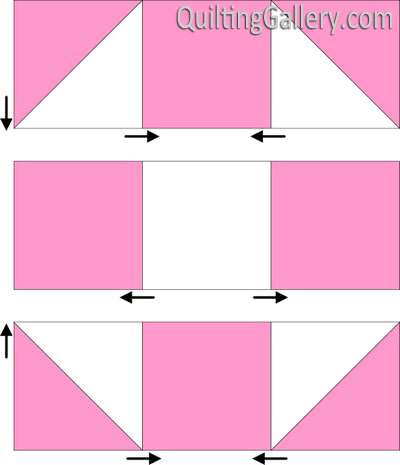
Always press in such a way to create the least amount of bulk. For example, if you have a half-square triangle unit and a square, press towards the square so that you’ll have less bulk. Once the rows of your block are pieced, be sure to alternate the seams so that you can nest your blocks snug. Then press the rows to, again, produce the least amount of bulk. Here’s an example:
Here’s a great video on pressing your row units to one side:
Another very helpful tip involves four-patches. Four-patch units have four seams that meet together in the centre. Below are some examples:

In order to have a nice flat block, you need to spiral the seams of the last sewn line. This is what a quarter-square triangle looks like with the seams spiralled:
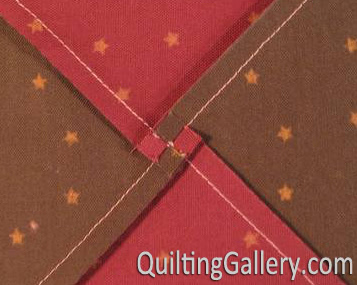
What you want to do is lay your block down on your ironing board, and lightly push the seams in opposite directions. The center section should open up and form that cute four patch in the centre.
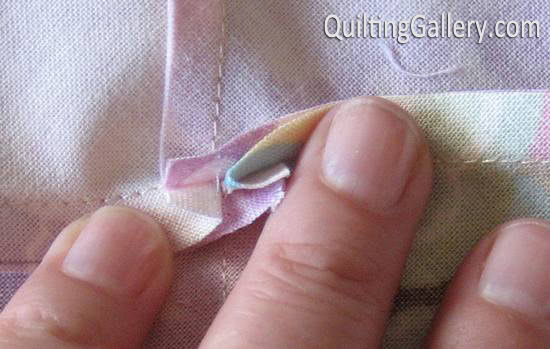
It might take a bit of practice, but once you get it to work, you’ll see how valuable this technique is for all of your four-patch units. Once you have the seams going in the directions you want, finger press your unit, then carefully press from the back with the iron. Turn your block over and press from the front.
Here’s a great video showing you how to press your four-patch units:
Aiming for Accuracy Quilt
I have broken down the Aiming for Accuracy quilt into various units that we’ll be stitching in the first 12 lessons of the quilt-along. In Lessons 13 to 15, we’ll be putting together the three main sections and filling in some of the little pieces needed for each section. Lesson 16 will be borders.
We will be stitching the largest blocks first, that take up the most fabric. For my 1930s QAL test version, it wasn’t until I got to Lesson 6, that I started to repeat fabrics used in other blocks. The blocks are not sewn in order, so having a design wall that you can use to show the approximate location of the unit, will be most helpful.
For each unit, I’ll be showing the diagram in pastel colours, that clearly indicates fabric placement and cutting instructions. Some lessons might have more than one unit being completed, so be sure to follow the diagrams closely. For some units, like today’s Unit C1, you’ll also be adding sashing strips as we go along.
All piecing is done with fabrics right sides together (RST) and using a 1/4″ seam allowance. Be sure to review the earlier lessons on Improving Quilting Accuracy.
It’s very important to understand the difference between finished and unfinished measurements. When referring to a finished measurement, this means that all seams have been completed and the unit is at the final size, with no raw edges left to stitch. Throughout the lessons, I’ll be giving you unfinished sizes, and it’s very important that you measure each piece as we go along so that the puzzle-like design will fit together at the end.
Disclaimer: This quilt design, tutorial and all photos are copyright Michele Foster of Mishka’s Playground. Please respect my copyright and do not copy this tutorial or republish it, for free or for sale, in print or online. You may use this tutorial to create quilts for your own personal use for free or for sale. However, please credit Michele Foster of Mishka’s Playground for the design. No mass production is allowed.
Great detail… thanks so much…. it will be a stitching weekend….
Hugz
Michele- enjoyed all the opinions on seam pressing “open” or to the side:) I, like you, have been a side seam presser and I am going to press open for this QAL and see what it does with improving the accuracy. Great first lesson. I guess I better go pick my fabrics for this block and get sewing.
I went through the checkout process and got to the download screen, when I clicked download, I got the message “internet explorer cannot display page”. Any suggestions?
The pressing technique shown is very clear. I have not been able to get my pressing so neat and crisp. This lesson should help me greatly.
Just returned from a Retreat sew I will be making the first block tonight…
This is my first attempt at a quilt I do have sewing experience so hoping that it will help. Thank you for the detailed lesson its the only of its kind that I was able to find, I look forward to seeing the final product!!!
Where do we have to upload the photos to enter in the weekly give away?
How and where can we upload the photos?
I was wondering how long it should take to get the downloads once you’ve ‘checked out’. I just discovered this sampler and oh how I want to join in. So I signed up via facebook and received a confirmation and proceeded to download all those week I’ve missed, but nothing has reached my email account yet. So was courious about the timeing. Can someone please let me know. Thanks. now I’m off to choose some fabrics.