
The Aiming for Accuracy quilt-along (QAL) was held in the Summer/early Fall of 2013. The lessons, blocks and detailed photo tutorials have been removed from this site and are now available for sale as a complete booklet.
Find out more about it here: Aiming for Accuracy Booklet.

Hi everyone! Just one week left until the first lesson of our Aiming for Accuracy Quilt-Along. We’ve been chatting up a storm in the Facebook Group; come join us!
For this week’s post, I’m sharing three tips to improve your quilting accuracy and the cutting instructions for the background/contrast fabric. By cutting this all at once in advance, we’ll make the best use of our fabric as we complete the various lessons.
Three Tips for Improving Quilting Accuracy
A few days ago, I shared with you my Recommended Products for Improving Quilting Accuracy. Today, I’m sharing three tips for improving quilting accuracy.
Cutting Fabric
Before you cut your fabric, it needs to be starched, preferably with Best Press, and then pressed very well. I prefer to use a very hot iron, set between linen and cotton, with lots of steam.
Here’s an excellent video from Leah Day on cutting your fabrics.
Also, Bonnie from Quiltville talks about different rulers, the lines on them and perfecting your cutting in her post Making the cut!. I agree with her 100% and can’t stress enough how the rulers that you use make a big difference. Rulers with thin and easy-to-read lines are the best.
1/4″ Seam Allowance
All of the piecing for our quilt will be done using a 1/4″ seam allowance. Because of the puzzle design of our top, your seam allowance will need to be 100% accurate or the pieces won’t fit together correctly.
Here are a series of blog posts that I think are worth reading and understanding how to achieve your 1/4″ seam allowance:
- That Quarter Inch
- Tutorial Tuesday – Quarter Inch Accuracy
- Scant Rant: A 1/4″ Seam Tutorial
- Scant Rant: A Quarter Inch Seam Tutorial for Basic Sewing Machines
- Does Pressing Method Affect the Scant Seam & Block Size?
Ok, so you’ve read the above tutorials and picked up some great tips on achieving your 1/4″ seam allowance. Now, it’s time to test your knowledge on your own machine with some scraps of fabric.
Just like you would with your real project fabric, press your fabrics really well, and following the cutting tips from above in Leah’s video, cut two squares at 2.5″. Sew these, right sides together, using your 1/4″ seam allowance, set your seams and press the sewn unit open or to one side (refer to that last tutorial above). What’s your measurement? Your two squares should measure exactly 4.5″ wide by 2.5″ high. How does your unit measure up?
I don’t want to be preachy, but if you’re not getting an accurate seam allowance and your finished pieces are too small or too large, you’re going to be disappointed. Let’s solve this problem now before you get started. So, back up, re-check that you cut your fabric squares accurately, then check your sewing machine set-up. Are you using a thin thread, such as Aurifil 50wt? Are you pressing your seams accurately?
If you’re struggling with this and just can’t seem to figure out what’s wrong, please post a photo in the Facebook Group and tell us what you’ve tried so far, and we’ll try to help you out.
A few of the above tutorials talked about a scant 1/4″ seam allowance. If that’s what you need to achieve the finished size, then use a scant seam allowance. There’s nothing wrong with that. There are three blocks/units in our quilt, where I’m going to suggest you do use a scant 1/4″ seam. One is the way the block is put together and the other two units are because we are working with several very small pieces of fabric, and every time there’s a seam, whether it’s pressed open or to the side, you lose just that much more when you’re piecing that it’ll make a difference to the overall finished unit size.
Fabric Ease
If you come from the seamstress world, you will already be familiar with Ease and how you can use it to your advantage to connect two pieces that may differ slightly in length. Essentially, easing is taking advantage of your sewing machine’s feed dogs to ease, or blend, two pieces of fabric so that they are the same length when sewn. You do this by placing the fabric that is longer on the bottom and using a tonne of pins to attach the fabric on the top.
For this quilt, when we’re attaching the sashing strips, if your seam allowance is accurate for the block/unit you’ve stitched, you’ll be sewing with the block in the bottom and your accurately-cut sashing strip on top, pinning as needed. This way, your block is eased into the accurate sashing strip.
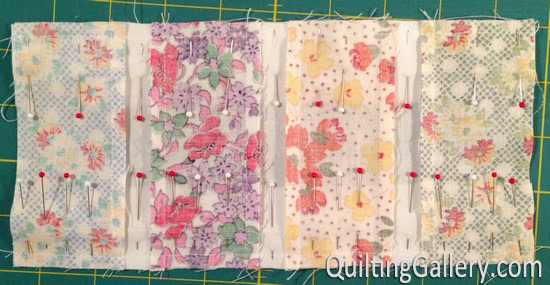
However, there may be times when you need to rely on the accuracy of the sashing strip, as you know you’ve cut it correctly and your block is a tiny bit short. I’m talking 1/8″ or less, anything more and get out your seam ripper and try that unit again. The photo below shows one small 9.5″ unit that was a little shorter than it should have been. The sashing strips were cut accurately, but my unit was a bit on the small side. You’ll see that I needed a tonne of pins to get these pieces to match perfectly. This unit has sashing attached to both the top and bottom.
I’ll show an example of easing a block to a sashing strip when the block is a bit larger during our block lessons. It’s great to take advantage of easing when you can, and especially useful when attaching sashing strips and borders that you know have been cut accurately.
Quilt-Along Cutting Instructions
Next Thursday, will be our first lesson for the quilt-along. To get ready, below are the instructions for cutting the background/contrasting fabric used in the quilt blocks and the sashing strips to complete the quilt top. We’ll cut the border fabrics in our last lesson.
I don’t like struggling with a large amount of fabric yardage on my ironing board, so I always cut off a smaller section to work with. I strongly recommend starching your fabric with Best Press. For the sashing strips, I treated my fabric to Best Press twice before cutting. Be sure to watch Leah’s video above on cutting fabric.
Contrast Fabric for the Blocks
You need a strip of fabric that is 25.5″ long by width of fabric (WOF). Depending on how straight your fabric is add at least 1″ to that measurement for straightening.
Cut the following strips across the width of the fabric (i.e. from one selvedge to the other selvedge):
- 2 strips at 4″, sub-cut into (16) 4″ squares
- 1 strip at 2″, sub-cut into (4) 2″ squares and (2) 6.5″ x 2″ rectangles
- 1 strip at 3.5″, sub-cut into (4) 3.5″ squares and (1) 2.5″ x 3.5″ rectangle, then trim the rest of the strip to 3″ and sub-cut into (6) 3″ squares
- 1 strip at 5.5″, sub-cut into (4) 5.5″ squares, plus (1) 4.5″ square
- 1 strip at 6.5″, sub-cut into (5) 6.5″ squares
With the fabric remaining from each of the strips after you’ve done the sub-cutting above, cut the strips at 1.5″ across whatever length you have left to be used for sashing.
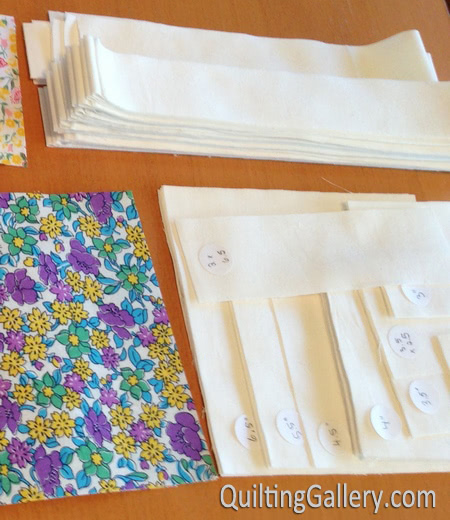
Be sure to label all of your fabric pieces and put them in zip lock bags for safe keeping. This quilt-along is four months long.
Sashing Strips
Cut a section of fabric at approximately 17″ by WOF. Cut this into 10 sashing strips at 1.5″ by WOF.
Here’s a photo of my fabric cut for the 1930s test version of this quilt:
Leave a Reply