
Welcome everyone to our second installment of the Delightful Stars Quilt-Along (DS QAL). Thanks everyone for your patience as the flu and migraines took over for me last week. Hopefully, we’ll be back on track now going forward.
This week’s preliminary lessons is available for everyone to read. Our first star block will be released tomorrow to those that have purchased the QAL. You can purchase the QAL at any time. We’re also chatting, sharing our fabrics and counting down to our official start tomorrow in the Facebook Group
Creating Triangle and Flying Geese Units
All of the pieced star blocks for this quilt are created with various triangle units. Presented below are tutorials for the following:
- Half-square triangles (HST)
- Quarter-square triangles (QST)
- Split quarter-square triangles (SQST)
- Flying geese (FG)
- Skinny flying geese (SFG)
For the first four tutorials, there are two options presented for creating the triangle units. The first method is by cutting squares, drawing lines, stitching, cutting apart, etc. The second method is for those using one of the specialty rulers. For the SFG units, I explain how to use the Tri-Recs ruler set.
For all pieced star block lessons, I will be providing the cutting instructions for both methods. For the stars that have SFG units, I will also be providing a paper pieced version and a template for rotary cutting that can be used instead of the Tri-Recs ruler set. I will not be including step-by-step instructions, within each lesson, on how to create the various triangle units. You’ll want to refer back to the tutorials as needed.
If you did my Aiming for Accuracy quilt, you will be very familiar with the square method of making HST, QST and SQST units. All squares were cut oversized and once the unit was constructed, it was trimmed and squared up to the desired cut size. If you wish to oversize the triangle units, in the tutorials below and for all of the pieced star block lessons, use the cut oversized square size presented in square brackets [].
Triangle units are cut and sewn on the bias edge. I strongly suggest using spray starch, such as Mary Ellen’s Best Press or Magic Sizing, to add body, stiffness and stability to the fabric before cutting and again during final pressing of the unit before sewing it into the quilt block.
Specialty Rulers
The Easy Star & Geese Ruler is double sided. Side A, in pink, is used to cut quarter-square units. Side B, in teal, is used to cut half-square units. Similarly, the Easy Angle ruler is for half-square units and the Companion Angle is for quarter-square units. Always position the ruler so that you can read the writing, i.e. not upside down. In the cutting charts, I refer to Side A as QST and Side B as HST.
For the speciality rulers, you will cut strips of fabric that are 0.5" larger than the desired finished unit size. Both ruler types have a blunt tip that you line up on the top edge of your fabric strip and the line on the ruler is lined up on the bottom edge.
The lines on the Easy Star & Geese Ruler start at finished sizes of 4" for quarter units and 2" for half units. I have drawn additional lines on my ruler so that I can cut smaller units. One other thing to note about this ruler, on Side A (quarter), the finished size numbers of flying geese can be confusing. When using this ruler to cut quarter units, the second finished size number is the one to look at. For example, the 2×4 line that uses a 2 1/2" strip, the 4 in the 2×4 indicates what the finished quarter-square size will be.
Half-Square Triangles (HST)
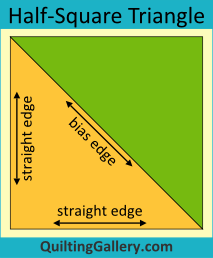
Half-square triangles (HST) are created by cutting, on the diagonal, two squares that are 7/8" [1"] larger than the desired finished HST size. For greater accuracy and less distortion, the bias edge should be in the middle of the HST unit, not on the outside edges.
Square Method
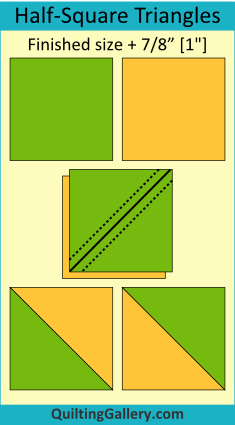
- Cut two squares of fabric that are 7/8" [1"] larger than the finished unit size. For example, if you want a 4" finished HST unit, cut two squares that are 4 7/8" [5"].
- On the wrong side of one of the squares, with a pencil or other marking tool, mark a diagonal line, corner to corner.
- From this drawn line, stitch a scant 1/4" away on both sides.
- Press the block to set the seams.
- Cut in half directly on the diagonal line, corner to corner, to yield two HST units.
- Open up the HST units, and lightly finger press in the desired direction, making sure that there are no tucks at the corner edges. Be careful as this is a bias edge and you don’t want to distort it out of shape by pressing too hard. Press with your iron.
- If you have cut your squares oversized, trim the HSTs to the unfinished size. For a 4" finished unit, trim to 4.5".
Tip: I prefer to draw my stitching lines and I also cut my squares oversized and then trim to the desired size. My favourite tool for this is the Perfect Half-Square & Quarter-Square Triangles Ruler from June Tailor. Check out the video tutorial.
Specialty Ruler Method
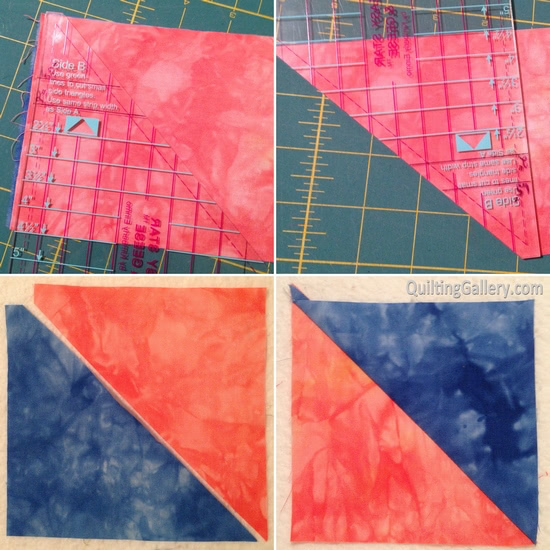
- Cut two strips of fabric that are 0.5" larger than the finished square size. For example, if you want a 4" finished HST unit, cut two strips that are 4.5".
- Layer the two strips right sides together. This is important as the units you cut should be mirrored.
- Use Side B of the Easy Star & Geese Ruler, or the Easy Angle ruler, line up your ruler with the 4.5" line and the blunt top. Cut two units.
- Stitch the units together with a 1/4" seam allowance. Start stitching at the blunt edge not the point.
- Press the block to set the seams. Open up the HST units, and lightly finger press in the desired direction, making sure that there are no tucks at the corner edges. Be careful as this is a bias edge and you don’t want to distort it out of shape by pressing too hard. Press with your iron.
Create a Sample
| Square Method | Specialty Ruler Method | ||
| Quantity | Square Size | Quantity | Strip Height |
| 1 each of two prints | 4 7/8" [5"] | 1 each of two prints (RST) | 4.5" HST |
If you cut your squares oversized, trim to 4.5". The square method will yield two HST units and the ruler method will yield one HST unit.
Quarter-Square Triangles (QST)

Quarter-square triangles (QST) can be made with two, three or four different fabrics. They are created by cutting, on the diagonal twice, squares that are cut 1.25" [1.5"] larger than the desired finished QST size. For greater accuracy and less distortion, the bias edges should be in the middle of the QST unit, not on the outside edges.
Two fabrics will create an hour glass block, while four fabrics create mirrored images.
Square Method
- Cut two (or four) squares of fabric that are 1.25" [1.5"] larger than the finished unit size. For example, if you want a 4" finished QST unit, cut two (or four) squares that are 5.25" [5.5"].
- On the wrong side of one (or two) of the squares, with a pencil or other marking tool, mark a diagonal line, corner to corner. From this drawn line, stitch a scant 1/4" away on both sides.
- Press the block to set the seams. Cut in half directly on the diagonal line, corner to corner, to yield two (or four) HST units.
- Open up the HST units, and lightly finger press in the desired direction, making sure that there are no tucks at the corner edges. Be careful as this is a bias edge and you don’t want to distort it out of shape by pressing too hard. Press with your iron.
- Layer the HST units, right sides together, carefully matching the centre intersection. Draw a line, corner to corner, in the opposite direction of the seams previously sewn. From this drawn line, stitch a scant 1/4" away on both sides.
- Press the block to set the seams. Cut in half directly on the new diagonal line, corner to corner, to yield two (or four) QST units.
- For less bulk, press the newly created seam so that it spirals on the back. Refer to this video.
- If you have cut your squares oversized, trim the QSTs to the unfinished size. For a 4" finished unit, trim to 4.5".
Specialty Ruler Method
- Cut two (or four) strips of fabric that are 0.5" larger than half of the finished square size. For example, if you want a 4" finished HST unit, cut two strips that are 2.5".
- Use Side A of the Easy Star & Geese Ruler, or the Companion Angle ruler, line up your ruler with the 2.5" line and the blunt top. Cut four units.
- Stitch the units together with a 1/4" seam allowance. Start stitching at the blunt edges not the points.
- Press the units so that the seams are in opposite directions. For example, if you are using two fabrics, press the seams toward the same fabric. You want to be able to nest the seams in the next step.
- Layer the units, right sides together, carefully matching the centre intersection. Pin as needed.
- Press the block to set the seams. For less bulk, press the newly created seam so that it spirals on the back. Refer to this video.
Create a Sample
| Square Method | Specialty Ruler Method | |||
| Quantity | Square Size | Quantity | Strip Height | |
| Sample 1 (two colours) | 1 each of two prints | 5.25" [5.5"] | 2 each of two prints | 2.5" QST |
| Sample 2 (four colors) | 1 each of four prints | 5.25" [5.5"] | 1 each of four prints | 2.5" QST |
If you cut your squares oversized, trim to 4.5". For sample 1, the square method will yield two QST units and the ruler method will yield one QST unit. For sample 2, the square method will yield four QST units and the ruler method will yield one QST unit.
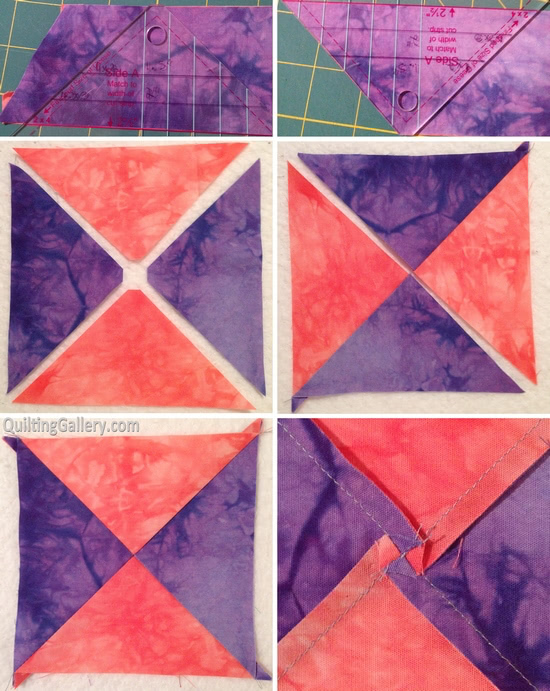
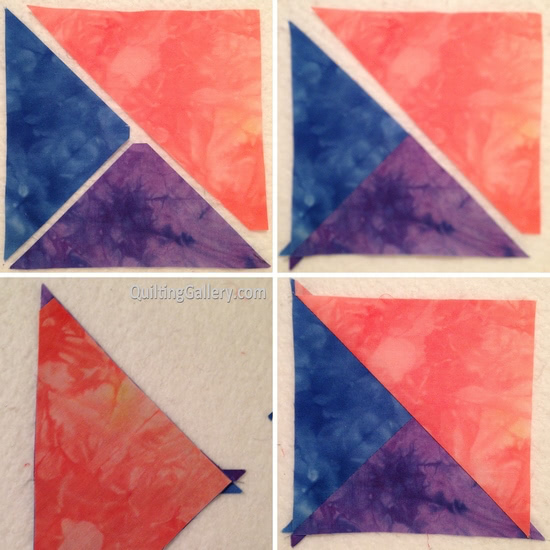
Split Quarter-Square Triangles (SQST)
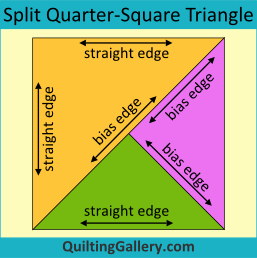
Split quarter-square triangles (SQST) are made with one HST and two QST units. For the quartered units, the squares are cut on the diagonal twice at 1.25" [1.5"] larger than the desired finished SQST size. For the halved unit, the square is cut at 7/8" [1"] larger than the finished size.
Square Method
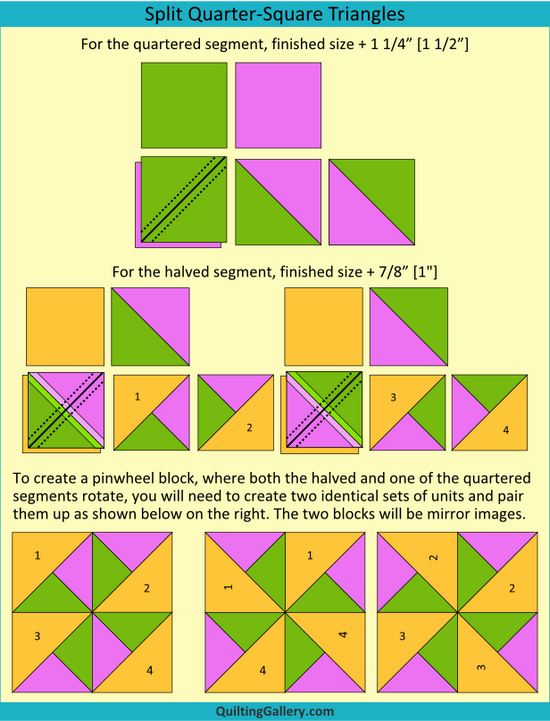
Note that if you wish to create a pinwheel block, where both the halved and one of the quartered segments rotate, you will need to create two identical sets of units.
- Start with two fabric squares that will make up the quartered units and are cut 1.25" [1.5"] larger than the finished unit size. For example, if you want a 4" finished SQST unit, cut two squares that are 5.25" [5.5"].
- On the wrong side of one of the squares, with a pencil or other marking tool, mark a diagonal line, corner to corner. From this drawn line, stitch a scant 1/4" away on both sides.
- Press the block to set the seams. Cut in half directly on the diagonal line, corner to corner, to yield two HST units. Press the HSTs in the desired direction. These HST units will actually become the quartered units in the next step.
- If you have cut your units oversized, you may wish to trim and square up the HSTs at this point so that they are the same size as the squares cut for the halved units, i.e. 7/8" [1"] larger than finished unit size.
- Layer each HST unit with one of the squares that will be halved. Draw a line, corner to corner, in the opposite direction of the seams previously sewn. From this drawn line, stitch a scant 1/4" away on both sides.
- Press the block to set the seams. Cut in half directly on the new diagonal line, corner to corner, to yield two SQST units, or four in total. Press the seams toward the HST unit.
- If you have cut your squares oversized, trim the SQSTs to the unfinished size. For a 4" finished unit, trim to 4.5".
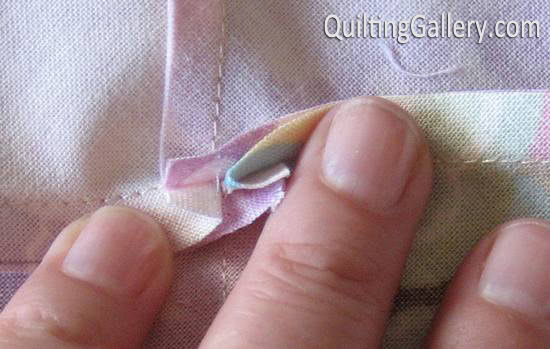
Tip: For best results, if you’ve cut your squares oversized use a ruler that has an X on it so that you can line up both seams when trimming and squaring up the units. The Perfect Half-Square & Quarter-Square Triangles Ruler is great for this.
Specialty Ruler Method
- For the quartered units, cut two strips that are 0.5" larger than half of the finished square size. For example, if you want a 4" finished SQST unit, cut two strips that are 2.5" (4"/2 + 0.5" = 2.5").
- Use Side A of the Easy Star & Geese Ruler, or the Companion Angle ruler, line up the ruler with the 2.5" line and the blunt top. Cut two units.
- For the halved unit, cut one strip of fabric that is 0.5" larger than the finished square size. For example, if you want a 4" finished SQST unit, cut a strip at 4.5".
- Use Side B of the Easy Star & Geese Ruler, or the Easy Angle ruler, line up your ruler with the 4.5" line and the blunt top. Cut one unit.
- Stitch the two quartered units together with a 1/4" seam allowance. Start stitching at the blunt edge not the point.
- Press the block to set the seams. I prefer to press this seam open.
- Stitch the quartered triangle unit to the halved triangle making sure to line up the centre point of the halved unit with the seam sewn for the quartered unit. Ignore the blunt tip.
- Stitch the units together with a 1/4" seam allowance. Set the seams and press the block towards the halved unit.
Create a Sample
| Square Method | Specialty Ruler Method | |||
| Quantity | Square Size | Quantity | Strip Height | |
| Quartered units | 1 each of two prints | 5.25" [5.5"] | 1 each of two prints | 2.5" QST |
| Half unit | 2 | 4 7/8" [5"] | 1 | 4.5" HST |
If you cut your squares oversized, trim to 4.5". The square method will yield four SQST units and the ruler method will yield one SQST unit.
Flying Geese (FG)
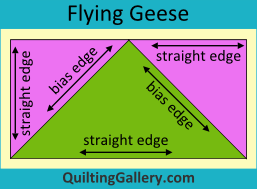
A traditional flying goose unit is twice as long as it is high. The goose body is made up of a QST unit that is cut finished length + 1.25" (1.5"). The goose sky is made up of two mirrored HST units that are cut from a square that is finished height + 7/8" [1"].
Square Method
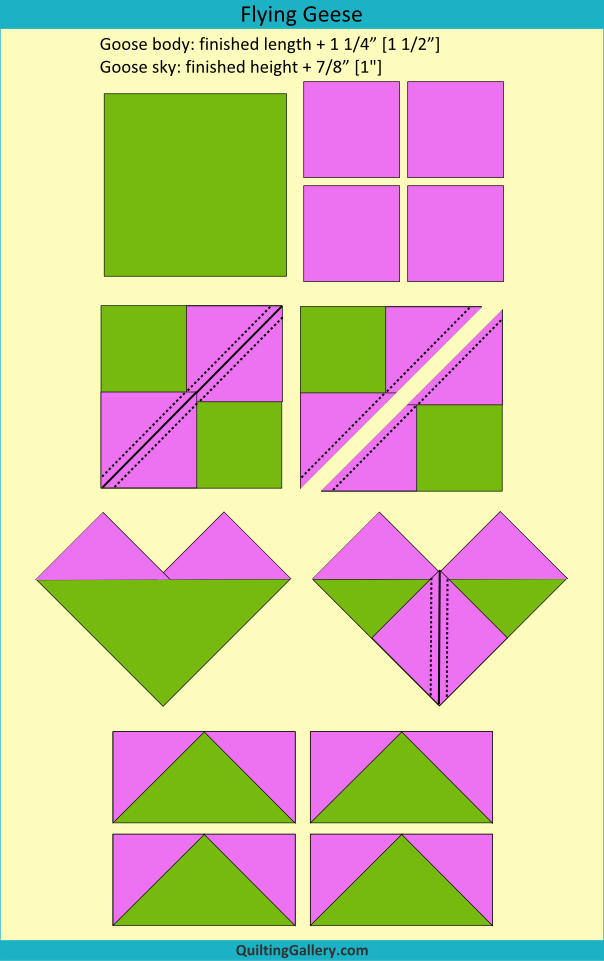
I’m not a big fan of the square method for making flying geese units and prefer instead to use the Easy Star & Geese Ruler; however, this method is quite popular as it results in no waste and you make four units at a time.
- Cut one fabric square for the goose body that is cut 1.25" (1.5") larger than the finished length of the FG unit. Cut four fabric squares for the goose sky that are 7/8" [1"] larger than the finished height of the FG unit. For example, if you want a 4"x2" finished FG unit, cut the goose square at 5.25" [5.5"] and the sky squares at 2 7/8" [3"].
- On the wrong side of all four of the sky squares, with a pencil or other marking tool, mark a diagonal line, corner to corner. Align two of the sky squares diagonally, as shown in the drawing, being careful that the lines from one sky square to the other line up perfectly. From the drawn lines, stitch a scant 1/4" away on both sides.
- Press the block to set the seams. Cut in half directly on the diagonal lines, corner to corner, to yield two partial FG units. Press toward the sky units and you will have two heart-like shapes.
- Align the other two sky squares so that the point is directly in the middle of the heart V and aligned on the outside edges as shown in the drawing. From the drawn lines, stitch a scant 1/4" away on both sides.
- Press the blocks to set the seams. Cut in half directly on the diagonal lines, corner to corner, to yield four FG units. Press toward the sky units.
- If you’ve cut the squares oversized, the FG units need to be trimmed to the unfinished size. Deb Tucker makes a Wing Clipper Ruler that is quite popular. See the Video.
Specialty Ruler Method
- For the goose unit, cut one strip that is 0.5" larger than half of the width of the finished FG unit. For example, if you want a 4"x2" finished FG unit, cut the strip at 2.5" (4"/2 + 0.5" = 2.5"). Use Side A of the Easy Star & Geese Ruler, or the Companion Angle ruler, line up the ruler with the 2.5" line and the blunt top. Cut one quartered unit.
- For the goose sky units that, cut one strip that is 0.5" larger than the height of the finished FG unit. For example, if you want a 4"x2" finished FG unit, cut the strip at 2.5". Fold the strip in half, right sides together, and cut two units from Side B of the Easy Star & Geese Ruler, or the Easy Angle ruler, lining up the ruler with the 2.5" line and the blunt top.
- Align one of the sky units with the goose body unit at the top blunt and bottom edges. You will have a little triangle of sky fabric that sticks out beyond the blunt edge. This is exactly what you want. Stitch with a 1/4" seam allowance starting at the top blunt edge. Press the unit to set the seam and then press toward the sky unit.
- Align the other sky unit, matching the top blunt and bottom edges. Stitch with a 1/4" seam allowance starting at the top blunt edge. Press the unit to set the seam and then press toward the sky unit.
Create a Sample
| Square Method | Specialty Ruler Method | |||
| Quantity | Square Size | Quantity | Strip Height | |
| Goose body | 1 | 5.25" [5.5"] | 1 | 2.5" QST |
| Sky units | 4 | 2 7/8" [3"] | 2 RST | 2.5" HST |
If you cut your FG units oversized, trim to 4.5"x2.5". The square method will yield four FG units and the ruler method will yield one FG unit.
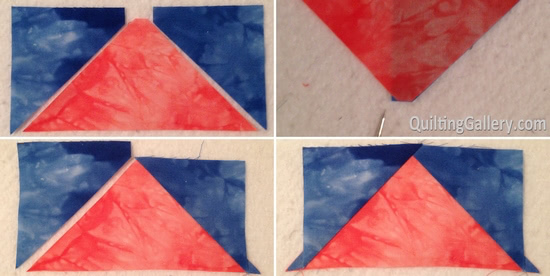
Skinny Flying Geese (SFG)
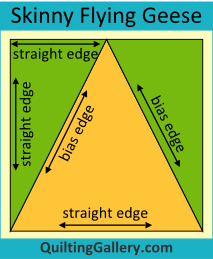
For the star blocks that that have SFG units, I recommend the Tri-Recs Tool. However, I will also be providing a paper pieced version and a template for rotary cutting that can be used instead.
Specialty Ruler Method
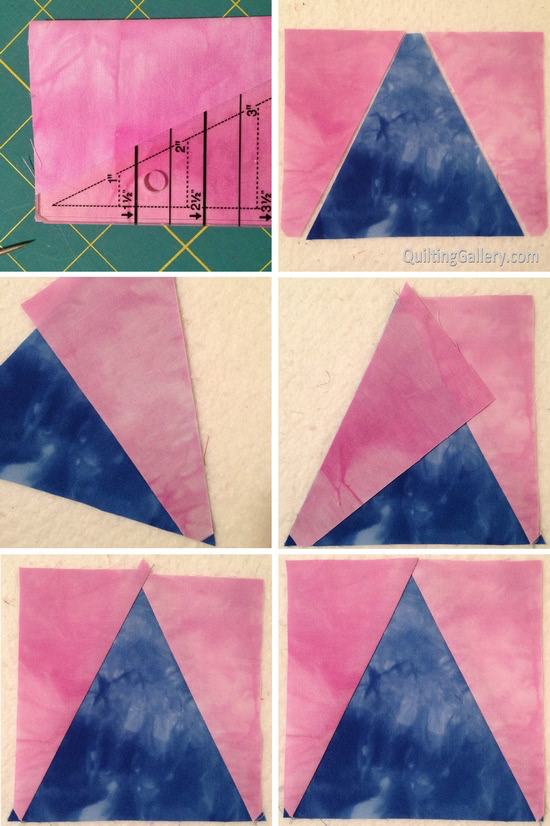
As with the other specialty rulers, to use the tri-recs tools, you will cut strips of fabric and then use the rulers to cut out the pieces. All measurements are on the ruler set.
- Cut the body of the goose unit using the Tri Tool lining up the strip of fabric with the blunt edge of the ruler and the desired cut line.
- To cut the sky units, fold the strip in half, with right sides together, and cut two units with the Recs Tool lining up the blunt edge and the desired cutting line. Most important, notice the little notch that appears at the top on the opposite side of the cut angle. See the photos. This notch is required.
- Referring to the third photo, align the first sky unit on top of the body unit. This is where the notch comes into play. The side notch should be aligned with the bottom of the body unit. Stitch with a 1/4" seam allowance starting at the blunt edge. Press the unit to set the seam and then press toward the sky unit.
- Align the other sky unit, matching the notch with the bottom of the body unit. Stitch with a 1/4" seam allowance starting at the blunt edge. Press the unit to set the seam and then press toward the sky unit.
- When trimming the dog ears at the bottom of the unit, you want to line up a square ruler parallel with the side of the sky in order to trim the tiny bit of the body unit that extends on the side. The remaining body tip will be hidden in the seam allowance.
Create a Sample
| Tri-Recs Ruler Method | ||
| Quantity | Strip Height | |
| Goose body | 1 | 4.5" TRI |
| Sky units | 2 RST | 4.5" REC |
The sample will create a 4.5" unfinished SFG unit.
Additional Resources
General:
- Math Tricks with Specialty Rulers (Bonnie Hunter – Quiltville)
- Video: June Tailor’s Perfect Half-Square & Quarter-Square Triangles Ruler – recommended for HST, QST, SQST units
- Half Square Triangles: Specialty Tools Connecting Threads
HST:
- Video: How to make Half Square Triangles – Quilting 101 (Fat Quarter Shop)
- Half Square Triangles: 8 at a Time! (Sew Mama Sew)
- Photo Tutorial
QST:
- Video: Quarter Square Triangles Blocks (Billie Lauder)
- Hour Glass Tutorial (Faith Jones – Fresh Lemons)
- Photo Tutorial
SQST:
FG:
- Video: Flying Geese the Easy Angle way! (Bonnie Hunter – Quiltville)
- Video: Flying Geese Block-Four at Once (Billie Lauder)
- No Waste Flying Geese Tutorial (Pieceful Kwilter)
- Video: Deb Tucker’s Wing Clipper Ruler for Perfect Flying Geese
- Four Methods to Make Flying Geese (Molly Flanders Makerie)
SFG:
- Video: How to Use the Tri-Recs Tool (Fons & Porter)
- Cutting and Piecing 54-40/Fight Unit (Piecemeal Quilts)
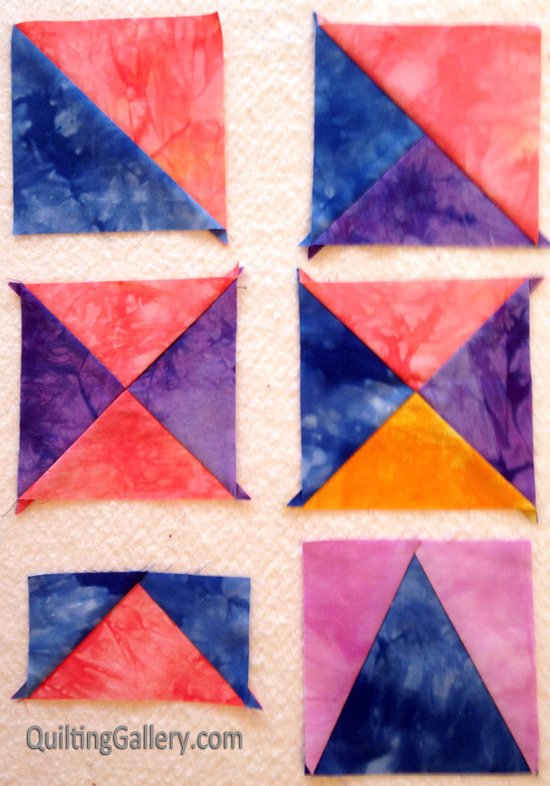
My five samples …
Join the Quilt-Along
For more info and to purchase the DS QAL, visit the main Delightful Stars Quilt-Along page.

I just want you to know -you changed my sewing enjoyment with the last A4A 2013 QAL. The joy continues with this one. I’m so glad my life calmed down enough for me to join in. Thanks for your great tutorials also.