
On this Valentine’s Day, I’d like to share with you a method that I have found works great for adding borders to a quilt. I used to hate adding borders to my quilt tops. I would tell myself that I didn’t need to do borders; that the top was fine without. But I knew better than that. A border can take a quilt top from great to fantastic. So I would just cut long strips of fabric and sew them onto the edges and lop off the extras. But when I would hang it up, stand back and look at it, the borders would be wavy and not square. It was very frustrating!
Since then, I have learned a method that works for me and I actually enjoy adding borders; and the more borders the better! This method determines at the beginning the length that the borders need to be to keep the quilt top square. And then it insures that the borders are sewn on correctly so they are not wavy and there is no extra fabric to cut off.
To add borders to your quilt top, there are a few tools you will need. First off, you will need a tape measure. Your tape measure is your friend. Keep it close at hand, in a place where it can always be found so that you use it a lot. You are going to need a piece of paper and a pencil to keep all of the numbers straight. You will also need an iron, ironing surface, scissors or a rotary cutter and pins.
The first thing that you need to do is to give the quilt top a good pressing. Make sure all of the seam allowances are pressed in the direction you want them to go. After pressing, I like to hang the quilt top on a wall but spreading it out smooth on the floor would work as well.
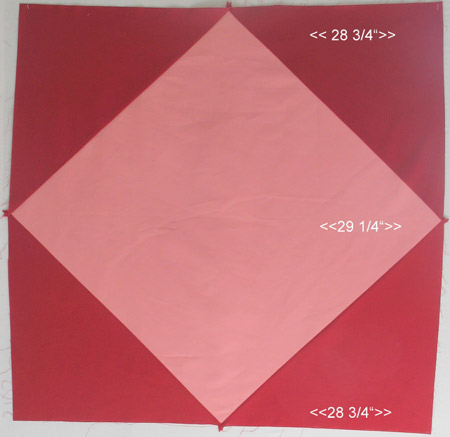
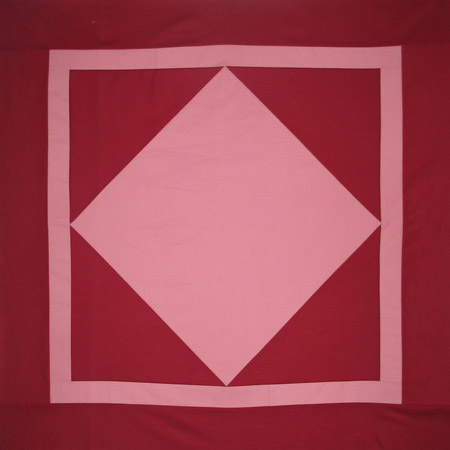
And now it is time to measure. Measure the width of the quilt top three times; once across the top, once across the middle and once across the bottom. In a perfect world those measurements would all be the same. I don’t know about your world, but mine is far from perfect. The measurements are rarely the same. But as long as they are not too different I can work with them. If they are too different, then I try to work with the quilt top, restitching seams, and whatnot to see if I can bring the measurements closer. As you can see in my example I came up with 28 3/4″, 29 1/4″ and 28 3/4″.
When you have the three measurements, find the average of them by adding them up and dividing by 3. For my example that would be:
28.75 +29.25 +28.75 = 86.75
86.75/3 = 29
This is the length of border you will need to cut for the top and bottom borders. I will cut my border strips each 29 inches long.
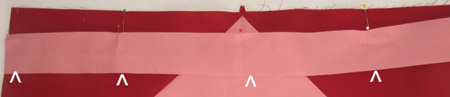
From your border fabric cut strips the width of your border plus 1/2 inch for the seam allowances. Then cut it to the length you have determined. Fold the border fabric in half lengthwise and mark the middle with a pin. Fold again in quarters and mark the quarter points with pins. Do this also with the quilt top. Fold the top edge in half and mark with a pin and fold in quarters and mark with pins.
Pin the border piece to the quilt top right sides together, lining up the ends and lining up the pins marking the middles and the quarters, easing the border to fit the top. This ensures that the border does not get stretched too long as you sew. Sew the border to the quilt top.
Now do the same thing with the bottom border using a border strip cut the same length as the top border. The top and bottom borders are done! Hang it up or spread it out on the floor again. Stand back and enjoy how it looks!

Now grab your tape measure again and measure the quilt length three times, once on the left side, once in the middle and once down the right side, including the top and bottom borders in the measurement. Take the average of the three numbers and that is the length to cut the border strips for the sides. For my example I came up with 97.75/3 = 32.58. So I am going to round it to 32 1/2″.
Cut your border strips to length and, again, divide the borders and quilt top into halves and quarters and pin. Pin the borders to the top with the right sides together and sew in place.
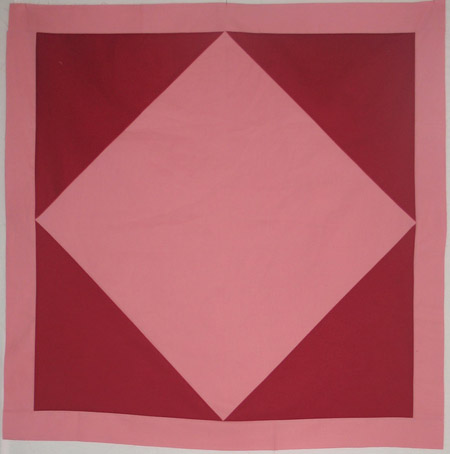
And the first border is done! I’m going to add another border to this one. So I will go through all of the same steps again; measuring and adding the top and bottom borders first then measuring and adding the side borders last.
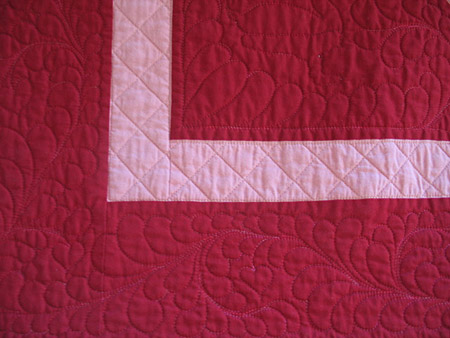
And Viola! The borders are done! Since they were cut to the same lengths the edges are all the same. Now to the really fun part.. the quilting!

To see more photos of the quilting and to see why this quilt is not only red and pink, but also green, check out my blog at Contemporary Traditions.
I wish you all a sweet, sweet Valentine’s Day!!
Deb Geyer
Thanks, I’ll have to try this on my next quilt. I have always put the side borders on first and not been that careful on the lengths.
great tutorial!
Excellent information! I’ve scheduled a link to this post to go live on my blog February 21. I hope it brings you a few extra clicks.
Denise
http://needlework.craftgossip.com