
Welcome everyone to the first post of our Delightful Stars Quilt-Along (DS QAL). My apologies for the technical difficulties today getting this post published. My computer decided it didn’t want to work today. No doubt it’s tired of all this COLD weather too!
The first two weeks of our QAL are preliminary lessons. Next week I’ll be covering a couple of methods for making various triangle units, flying geese and the specialty rulers. These two lessons will be available on this site for everyone to read. Our first star block will be available Week 3, January 21st to those that have purchased the QAL.
You can purchase the QAL at any time. We’re also chatting, sharing our fabrics and counting down to our official start tomorrow in the Facebook Group
Below are some of my recommended tips on improving quilting accuracy that will help you as you create your Delightful Stars quilt.
Piecing Thread
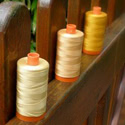
For piecing, use a good quality, thin and strong thread such as Aurifil 50 wt. The thin thread takes up less room and it doesn’t create a mini bump when pieced seams are pressed open or to one side. Less lint from a good quality thread is a bonus too, so you won’t have to clean your sewing machine as often. If you can’t find Aurifil at your local quilt shop, you can purchase it online from Bytowne Threads.
Best Press
I pre-wash ALL of my fabric, fat quarters and larger, before it goes into my sewing room. I know there are many strong feelings on both sides of the wash/don’t wash debate. I choose to pre-wash. Sure, it takes time, and dealing with the frayed and tangled edges can be a nuisance. Personally, I hate the smell and feel of fabric from the bolt. I have also had fabric bleed recently and you can bet I was very glad to discover that bad fabric before I put it into a quilt.
I don’t dry my pre-washed fabric in the dryer, which really helps to reduce the tangles. Instead, while it is still damp, I’ll smooth it out with my hands or by flicking/snapping it in the air (really it works), and let it air dry on a rack or just in a folded pile. It dries very quickly.
I use Mary Ellen’s Best Press to add body and stiffness to the fabric before cutting. I just lightly mist the fabric and I like to let it soak in and iron 1/2 hour or so later. I’ll also use Best Press once my block is completely sewn. You’ll be amazed at how crisp your seams will be. Depending on the quilt, I may even use it again once the entire quilt top is sewn before I baste it.

Another, less expensive, option is Magic Sizing. I’ve seen several quilters recommend this product. I was able to pick some up recently and will be trying it soon.
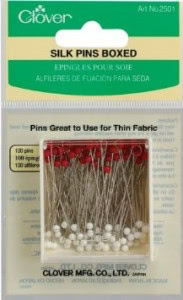
Pins are a Quilters’ Best Friend
I can’t stress enough how important pins are and how they help to improve your accuracy. My favourite pins for piecing are Clover’s Silk pins. They are thin and strong and go through the layers of fabric very easily. More tips on how to pin are covered below.
¼" Seam Allowance
All of the piecing for our quilt will be done using a ¼" seam allowance. Because of the puzzle-like design of the quilt top, your seam allowance will need to be 100% accurate or the pieces won’t fit together correctly.
If you need help achieving a ¼" seam allowance, here are some tutorials:
- That Quarter Inch
- Tutorial Tuesday – Quarter Inch Accuracy
- Scant Rant: A 1/4" Seam Tutorial
- Scant Rant: A Quarter Inch Seam Tutorial for Basic Sewing Machines
- Does Pressing Method Affect the Scant Seam & Block Size?
Now, it’s time to test your knowledge on your own machine with some scraps of fabric. Cut two squares at 2.5". Sew these, right sides together, using your ¼" seam allowance, set your seams and press to one side. What’s your measurement? Your two squares should measure exactly 4.5" wide by 2.5" high.
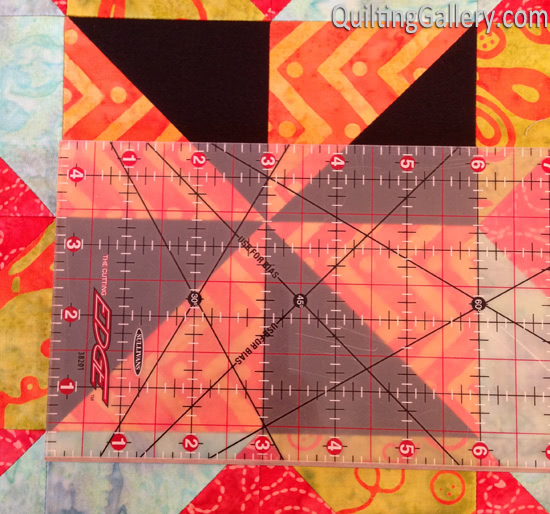
Measuring As You Go
For each star block in our quilt, I will be giving you the finished block size as well as the grid the block is based on. In order to ensure that your finished block will be the correct size, I recommend measuring the individual units as they are stitched.
In order to figure out what the individual units should measure once stitched, you take the finished block size and divide it by the grid used for the block.
For example, the individual units of a 12" finished block that is based on a 3×3 grid (i.e. a typical nine-patch block), would measure 4". Another example, the units of a 15" finished block that is based on a 5×5 grid, would measure 3".
12" (finished block) / 3 (grid) = 4"
15" (finished block) / 5 (grid) = 3"
The photo shows measuring the two sewn units of a 12" block that is based on a 4×4 grid. The individual unit size is 3". Two of them sewn together will be 6".
Easing Fabric
If you come to quilting from the seamstress or tailoring world, you will already be familiar with Ease and how you can use it to your advantage to connect two pieces that may differ slightly in length. Essentially, easing is taking advantage of your sewing machine’s feed dogs to ease, or blend, two pieces of fabric so that they are the same length when sewn. You do this by placing the fabric that is longer on the bottom and using a tonne of pins to attach the fabric on the top.
For this quilt, when we’re attaching the sashing strips, if your seam allowance is accurate for the block/unit you’ve stitched, you’ll be sewing with the block on the bottom and your accurately-cut sashing strip on top, pinning as needed. This way, your block is eased into the accurate sashing strip.
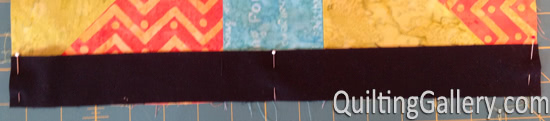
To attach a sashing strip or other blocks together, the first thing I do is fold the unit in half to find the exact centre, finger press a crease at the edge or draw a line so it’s easy to see. I’ll do the same with the sashing strip, i.e. find the true centre by folding in half.
Then, I’ll add a pins at the centre and both sides, making sure to align the sashing and block unit at the sides so that it is square.
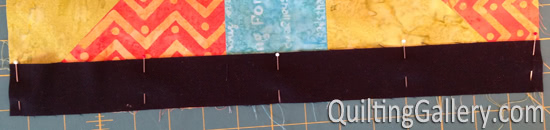
Then, I’ll add pins half-way between the centre and sides, essentially quartering the unit. If it’s a really long piece, or one that needs a lot of help easing together, I might fold the sides to the centre and mark the exact quarter spots of both the block and sashing piece.
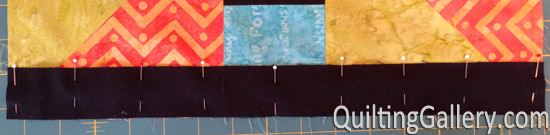
Finally, I’ll continue to add as many pins as needed to ease the pieces together and deal with any excess fabric before stitching. We don’t want to sew in any tucks or puckers when stitching the units.
Triangle Points
This tip deals with triangle points and is best show with several photos.
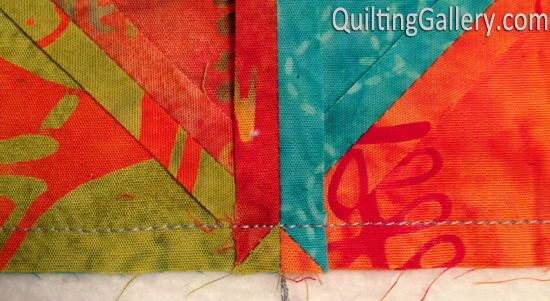
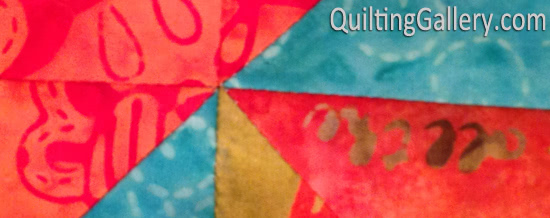
In this photo, notice that the stitching line is right above/touching the top of the little triangle units formed in the seam allowance. This is what we aim to achieve.
From the front:
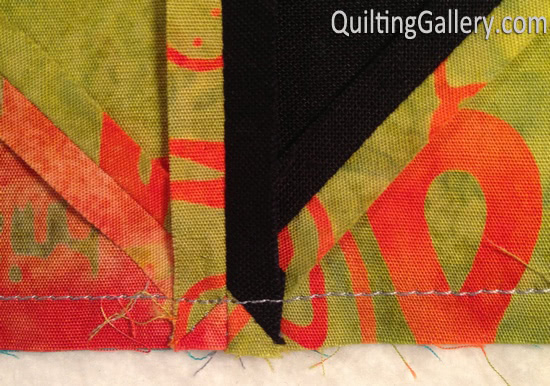
If you’re pressing your seams to one side, then you stitch directly through the X formed by the triangle unit and side seam as shown in the photo below:

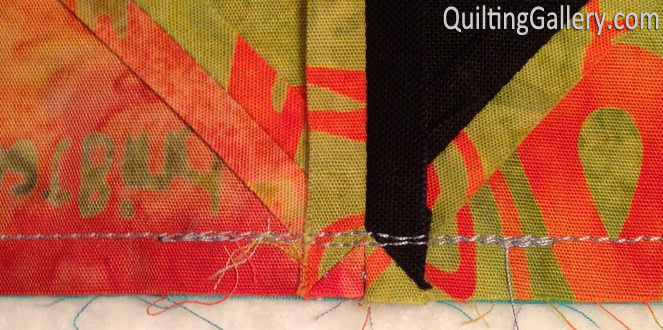
Compare with this photo, where it’s obvious that the stitching line is too narrow and didn’t hit the top of those little triangles.
From the front, there’s a noticeable gap:

To correct this problem, re-stitch just the section of the seam needed being sure to back stitch at the beginning and end. There’s no need to remove the other stitching line in this case.
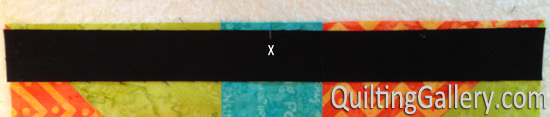
When attaching the sashing strips to the completed blocks, we sew with the sashing on top, which makes it impossible to see where the triangles are on the block. This photo shows what I do. I stick a pin directly into the seam at the edge of the triangle, where I want to sew, and through the sashing strip.
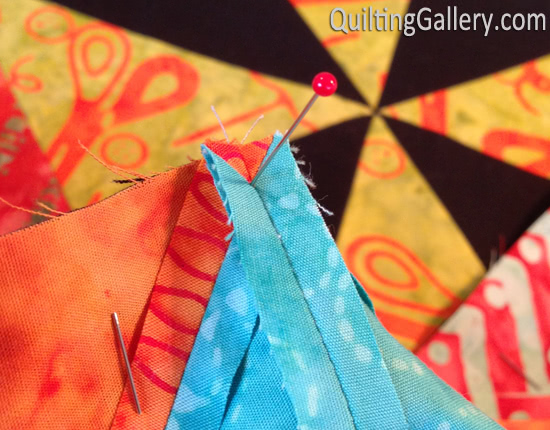
On the sashing strip, I’ll then mark exactly where that pin came through. Before doing this, make sure that your sashing strip is firmly secured with pins to your block, as there’s no point in marking where to sew if you move the sashing strip after.

For additional information, check out these Pinning Tips from McCall’s. They provide a PDF file that you can download too. I really like the double triangle idea.
Trimming and/or Squaring Up Blocks
I am a strong believer of NOT trimming or squaring up pieced blocks. Trimming your blocks, especially for this quilt with lots of triangle units, means that you’re taking away some of the seam allowance needed to attach those triangle units to the sashing and still maintain the integrity of the triangle points.
If you’ve cut your blocks accurately, sewn with an accurate ¼" seam allowance, pressed correctly without stretching, measured as you went, and aligned all seam intersections and all edges of your block/unit as you attach them together, you shouldn’t need to trim anything or square up your blocks.
Remember, fabric is flexible, it stretches and two pieces can be eased together by taking advantage of your sewing machine’s built in ability to ease fabrics together so that they are the correct length. Anything that’s less than ¼" off, can be hidden in the next seam allowance too.
Join Us!
For more info and to purchase the DS QAL, visit the main Delightful Stars Quilt-Along page.

As a beginning quilt instructor, I think you did an excellent job of presenting some key points for accurate piecing and quilting. I might have to join you so that I can follow along and maybe pick up a few new tricks along the way! Thank you!
I joined the QAL through Craftsy, and have been able to download your pattern before. But this morning, I received a message from Crafts letting me know it had been updated, but I can’t download it. The Download button doesn’t work, in either Firefox or Microsoft Explorer. Thanks.
Please ignore my other message. I tried it one more time, going in through My Patterns page instead of using the link in the email from Craftsy, and this time I was able to download the updated file. Thanks for the great tips.
Michelle!
I so wish that I could participate in this quilt along. Your last quilt along that I participated in was just awesome and of course not finished, but I will finish it! Your tips and tutorials are fabulous. They are to the point and concise and most importantly understandable. You are doing a great job and maybe I can join in a little later in the year. You are the “bomb”! That means the best!!! ROFL!!!