Quilting Gallery
michele@quiltinggallery.com
http://QuiltingGallery.com/

Logo: Quilting Gallery

Join the Quilting Gallery page on Facebook Follow MishkaOttawa on Twitter Join Quilting Gallery Flickr group Follow Mishka on Pinterest My pattern store on Craftsy Follow Quilting Gallery on Bloglovin RSS feed for Quilting Gallery blog Subscribe to the Quilting Gallery newsletter

Inspiring quilters' creativity, sharing ideas, making world-wide connections and having fun.

Quilting Gallery Blog

Beginner’s Quilt-Along: Block 3

Beginner's Quilt-Along

Hi everyone, welcome to Block 3 of the Beginner’s Quilt-Along (QAL). If you’re new here, you can join the QAL at any time. Complete the blocks one at a time each week, or you can set your own pace. No stress! Most of all, have some fun and hopefully learn a few tips and tricks along the way. See the main Beginner’s QAL page for more information and additional links.

Pat Sloan is quilting along with us too. She’s making two sets of blocks using her gorgeous Eat Your Fruits and Veggies fabrics. See her take on Block 3 here!

Don’t forget to upload your completed block to the Flickr group each week for a chance to win prizes. I have added a Sponsors and Prizes page that I will update on a regular basis. Winners are chosen randomly from the completed blocks submitted by 6:00 p.m. EDT on Wednesday.

We have two prizes this week:

First, the Fat Quarter Shop have donated a set of their new Little P’s patterns. These quick and easy patterns are perfect for the beginner quilter.

Little-Ps

Second, Pat Sloan has donated a scrap bag of her new fabric line with Moda Eat Your Fruits and Veggies.

pat sloan learning center scrap bag prize

Since the Fat Quarter Shop has donated a set of their patterns each week of our quilt-along, I went back and chose a second winner for our first block. Congratulations to maisie131957

maisie131957

The winners of Block 2 are:

If you’re a winner, please check your photo on Flickr for instructions.


Block 3 -Time for Ice Cream

Time for Ice Cream aka Shoo Fly

Our third block is a Time for Ice Cream, more commonly known as Shoo Fly. Jinny Beyer’s The Quilter’s Album of Patchwork Patterns, states that this block was first published by Ladies Art Company in 1897. It also appeared as Fence Row in 1935.

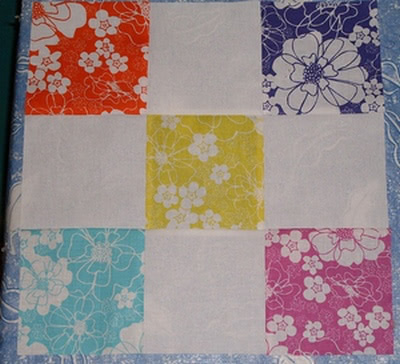
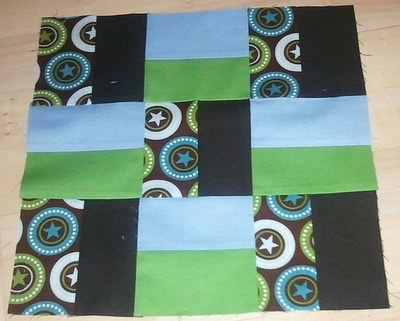
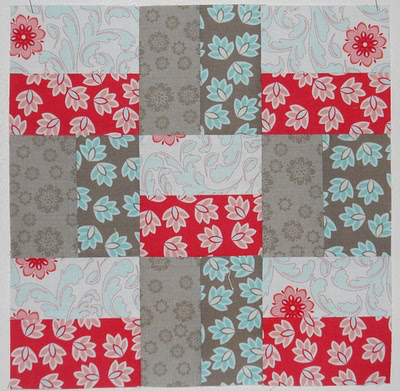
Here’s a Mosaic of photos from Flickr featuring the Shoo Fly Block. You can click the links underneath to see the full image on Flickr.

shoo-fly-variations

A note about block colours: I chose to represent this block in two colours; however, you can use a different colour for the centre block and for the half square triangles. The design choice is yours to make.


Tutorial: Half Square Triangles

This is our first block, of several, that contain half square triangles (HSTs). I’m going to show you below how to make them the easy way. In upcoming blog posts, I’ll share some other products, tools and resources for completing HSTs.

I strongly recommend you create a test block using scrap fabric before you cut your fabrics for this week’s block.

A little math:

To get started, we need to learn a little math … I know, I can hear you all groaning! Just a little! It’s important to understand the difference between finished and unfinished block sizes. For our QAL, we are making 12.5″ unfinished, or 12″ finished blocks. What this means is that once the quilt top is completed, our individual blocks measure at 12″. The 12.5″ unfinished is the size of our blocks before sashing is attached to each side, the extra 0.5″ is the seam allowance on all sides.

With me so far?

Now, all of our blocks are based on a 3×3 grid, meaning each block contains 3 units across and 3 units down. When calculating the individual unit sizes for the completed block, we always think in terms of the finished block size, ignoring entirely the seam allowance. So, we have a 12″ finished block, with 3 rows, just divide and you have 4″. Each unit of our block is 4″ finished. Taking it one step further, in order to sew the units together, we need seam allowance. Once we know the finished size of each unit, that’s when we add the seam allowance. We add 1/2″ to the finished size, which gives us 1/4″ on each side.

Hopefully this makes sense.

So, now we know that the finished size of each unit in our 3×3 grid is 4″, we can get to the triangle math. To make HSTs, we cut two squares 7/8″ + the finished size, or in our case 4 7/8″ square.

Now that I’ve given you the actual math for HSTs, tuck that information away under your hat for the future. We’re going to make our life easier, and our blocks more accurate, by over sizing our units just a little bit and then trimming them down to the required size.

For all of our triangle blocks in the QAL, the instructions include cutting the blocks slightly over sized and then trimming. I just wanted to make sure you knew the math behind it, so that if you’re following other patterns, or making up your own, you can easily adjust the measurements.

Sewing our HST Test Block:

So let’s get started making our test block. Cut two squares of scrap fabric at 5″ exactly (use different prints). This will yield two HSTs with a finished unit size of 4.5″ or 4″ once completely sewn in our block. On the wrong side of one of the squares, with a pencil, mark a diagonal line, corner to corner.

diagonal-line

From this drawn line, we’re going to stitch 1/4″ on both sides. However, I have difficulty with this, it’s an eye thing, and prefer instead to draw my stitching lines on my fabric as well. I have this very hand tool, Quilter’s Quick Quarter that makes this easy.

quick-quarter

I line up the middle of the tool, with the corners of my fabric square and draw the 1/4″ lines on both sides. You can use a regular ruler to achieve the same thing too.

quarter-lines

Depending on which method you chose above, stitch 1/4″ away from the center line or on the drawn lines if you chose to draw the 1/4″ lines as I did. I use a couple of pins to keep the block from shifting. When I stitch on the drawn line, I like to use an open foot so that I can see exactly where I’m sewing.

open-foot

This is what you’ll have. It’s normal for your block to be a little wavy as we’ve just sewn on the bias. Give it a good press to set the seams and flatten the block.

hst-sewn

Take the block back to your cutting table and cut in half. You now have two half square triangle blocks.

hst-cut

Back to the ironing board. If your fabric has a distinct light and dark, press towards the dark side. With the fabric you want to press towards on top, open up your HST and lightly finger press makiing sure there are no tucks at the corner edges. Be careful though, this is a bias edge and you don’t want to distort it out of shape by pressing too hard.

finger-press

Press with your iron. The dog ears on the sides are normal.

pressed-hst

Back to the cutting mat to trim our block. You’ll need a ruler with a 45 degree line on it. I really like my Easy Square Jr. Ruler for this as the lines are very easy to read.

Align the diagonal line (45 degrees) on the ruler with the diagonal on your block. We’ll be trimming the block to exactly 4.5″. Trim a bit off both sides, turn the block around, and clean up the other two sides. Remember that old saying, measure twice, cut once. Make sure you are reading your ruler correctly to trim to 4.5″

align-ruler

cut-one-side

Your completed HST should measure 4.5″ square.

finished-HST

Here’s a video on using the Quilter’s Quick Quarter tool:

Feel free to share your test blocks in the Flickr group too. If you have any questions or problems leave a comment here or on Flickr.


Tutorial: Block 3 – Time for Ice Cream

Time for Ice Cream - Shoo Fly

Please read all of the instructions before cutting your fabrics.

You need:

(1) 4.5″ square white
(4) 4.5″ squares black
(2) 5″ squares black (for HST)
(2) 5″ squares white (for HST)

When cutting fat quarters:

To make the best use of our fat quarters, from your black fabric, cut 1 strip at 4.5″ wide and another strip at 5″ wide. Sub-cut the 4.5″ strip into four 4.5″ squares. From the 5″ strip, sub-cut two squares at 5″ (save the rest of your strip for another block). For the white fabric, cut one strip at 5″. From this strip, sub-cut two squares at 5″ and then cut one square at 4.5″. Make sure to trim the 4.5″ square on all sides (i.e. you cut it from the 5″ strip). Here’s what you should have:

fabrics-block-3

In my photo, the flowered pink print represents black and the yellow print represents white.

Piecing the block:

With the two 5″ black and two 5″ white squares, follow the half square triangle tutorial above. Be sure to trim your blocks accurately to 4.5″.

making-hsts

Lay out your units in order following the block diagram.

layout-block-units

Stitch your units together in three rows as we did for the previous blocks in the Quilt-Along. When piecing together a half square triangle with a square I find it easier and more accurate to stitch with the triangle unit on top and to start sewing at the triangle edge.

For less bulk, we’ll press our seams for this block in different directions than we did in the previous blocks. For rows 1 and 3, press the seams toward the middle block, i.e. away from the triangle units. For the middle row, press the seams away from the center block. Pressing the rows in opposite directions will allow us to nest our seams accurately.

You’ll notice that rows 1 and 3 look a little odd, and that the triangle unit no longer goes to the edge of your block. This is exactly what we want. This represents our 1/4″ seam allowance for the edge of the block. You’ll see how it works once we attach our sashing strips to complete the quilt top.

rows-sewn-block-3

Sew rows 1 and 2 together, pinning at the seams and ends to keep things aligned nicely. Use as many pins as you need! I like to sew with my triangle rows on top so that I can be sure not to flip my seams the wrong way.

Press the seam towards row 1, then attach row 3.

rows1-2-block-3

Press the seam towards row 3. Again, you’ll have the excess 1/4″ seam allowance on the left and right sides of the block. This is correct. Your completed block should be 12.5″:

completed-block-3

Final pressing:

pressed-block-3

I have created a PDF file for the block tutorial and the HST tutorial. Download it here: Beginner’s Quilt-Along – Block 3

Any questions, please don’t hesitate to ask in the comments. Don’t forget to share your completed block in the Flickr group by next Wednesday, June 27 at 6:00 p.m. for a chance to win this week’s give-aways.

Important Notice: Google Reader will cease to exist on July 1, 2013. According to my stats, this will impact 75% of the readers that follow my blog via RSS. That's significant. Please consider using one of the alternatives I have suggested. I'd hate to lose you.

Stay connected: Subscribe to our Weekly Newsletter

Take an Online Quilting Class:

Online Quilting Class

Join the discussion!

21 Responses to “Beginner’s Quilt-Along: Block 3”

  1. Jo says:

    Done! I’m totally loving my squares! Sadly, i only use an ipad so i can’t post pics…no prizes for me! Come on block 4!

  2. VickiT says:

    Thank you for another great block and awesome tutorial. Now I need to see if I can get caught up since I have last weeks’ block to get done also.

  3. lee says:

    Wow – done? I am just getting to reading the post! The tutorial makes it look very easy! :)

  4. Kellie M. Mercie says:

    Tutorial maker is so easy i love this blog so much . By this i learn a lot . and such more information to learn .Thanks to share this great idea of yours .

  5. [...] Block 3 of our Beginner’s Quilt-Along is now available. Pat Sloan named this blocked Time for Ice Cream, aka Shoo Fly. It’s our first of several half square triangle blocks that we’ll be making. I’ve shared an easy (and the most common) method for making HSTs too. View the Block 3 tutorial here. [...]

  6. Carol says:

    Question:

    I notice that the half square triangles that are joined for the final 12.5 measurement, I am going to have a problem with a couple of the “points” when we do sashing. They are not the same and will not be 1/4 inch.

    What did I do wrong? Was it the last squaring up of the 12.5?

    Second question.

    When we connect the three strips each time, I am still forcing the “locking” three block seams. I think it is when I am running the last couple of stitches for the connection of two blocks. I try to go straight. I am using a connector fabric at the beginning and the two blocks go straight but once I can’t hold on to the end of the blocks I am navigating and sewing, I think I may be off a stitch or two and it is causing the problem.

    Any tips to keep those last couple of stitches the same width and not shifting?

  7. Mishka says:

    Hi Carol,

    What’s your Flickr name so I can see your photos?

    Not sure what you mean by the last squaring up of the block .. I suggest not squaring up the blocks at this time. I’ll give a lesson on that when we attach our binding strips.

    Second, this is a common problem, and even I do it too if I’m not paying attention. The key is to continue holding the fabric in place as it is guided through the machine until past the needle. Your 1/4″ seam should remain consistent until the very end. This is probably why your 1/4″ seams aren’t accurate on the edges, but I need to see the photos to be sure.

    Hope this helps!
    Michele

  8. JoHam says:

    Just discovered your tutorial. Love it, especially your choice of fabric. Hope to do the blocks so I have to dig in my stash. Easier said than done!

  9. 4dreamsr says:

    Using a stiletto to hold that last little chunk of seam fabric is what I do to keep my seam straight to the end. Also hold onto the left side of the seam as that end feeds thru. A wooden skewer sharpened on one end is what I use. Resist the urge to use the point end of scissors or seam ripper. Tragedy may occur to fabric!

    Also on this block especially, if it doen’t end up 12.5″ unfinished after piecing, your seams to sew up individual 4.5″ unf blocks is off. In other words, if each of the 9 blocks used to piece this block are 4.5″ unf then it should measure 12.5″ if those last seams are 1/4″.

    Michele, love this BQA & hope you don’t mind me putting my 2 cents in.

  10. DJ Langer-Street says:

    This was fun to make and I enjoyed the practice of making HSTs. Thanks so much for doing this.

  11. [...] the Simplicity Creative Group, the makers of the Easy Square Jr. ruler that I featured in Block 3, have donated a few [...]

  12. Jean Adams says:

    Hey I just discovered ur blog and I want to do the Quilt along how do I get the information for the beginning blocks 1 2 3…Thanks

  13. [...] (HSTs) using the 5″ squares. Be sure to trim your units accurately to 4.5″ square. See Block 3 for the HST [...]

  14. [...] (HSTs) using the 5″ squares. Be sure to trim your units accurately to 4.5″ square. See Block 3 for the HST [...]

  15. [...] elde ediliyor. İki üçgenden oluşan karenin nasıl yapıldığı ayrıntılı olarak 3. bloğun sayfasında anlatılıyor. Share [...]

  16. [...] (HSTs) using the 5″ squares. Be sure to trim your units accurately to 4.5″ square. See Block 3 for the HST [...]

  17. [...] method to get my blocks consistent. So, I would go back to the original way I presented in our Block 3 HST tutorial and use my Easy Square Jr. Ruler to trim the blocks or even use my Perfect Half-Square & [...]

  18. [...] (HSTs) using the 5″ squares. Be sure to trim your units accurately to 4.5″ square. See Block 3 for the HST [...]

  19. [...] Ben doÄŸrudan makinede patchwork ayağı (1/4″ ayak) ile dikiyorum. Daha detaylı bilgi için 3. bloÄŸun anlatıldığı sayfaya [...]

  20. [...] the 5" squares, create four HST units following the tutorial from Block 3. Be sure to trim your units accurately to 4.5″ [...]

Comments are now closed for this blog post. Contact me!