Quick stats:
- Total submissions: 33
- Total countries: 11
- Total provinces: 4
- Total states: 14
You can click on the photo to view a larger version.
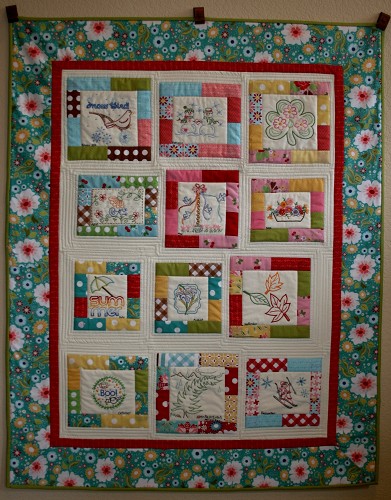 |
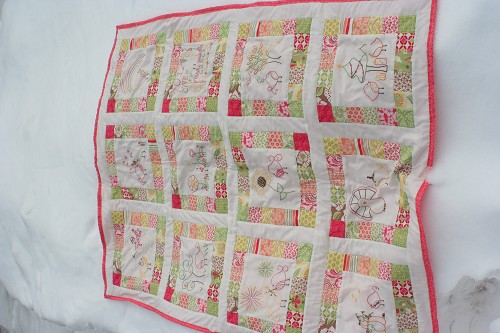
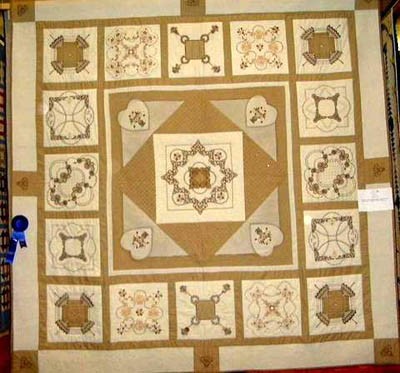
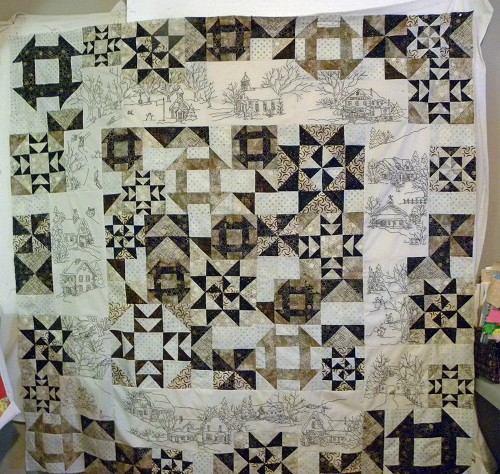
2012 Aurifil Designer of the Month Quilt By: Debbie, California, USA I loved participating in the 2012 Aurifil Designer of the Month sew-along last year! This is my finished quilt which has embroidery blocks designed by talented featured designers. Quilt size: width: 42" height: 54" |
 |
A Happy Life By: Delia Hardcastle, United Arab Emirates A Happy Life was quilted while on a restful vacation in Perth, Australia. As it was the only project I had on hand it ended up being heavily embroidered and beaded. It brings back many happy memories of our time spent there. Quilt size: width: 37" height: 39" |
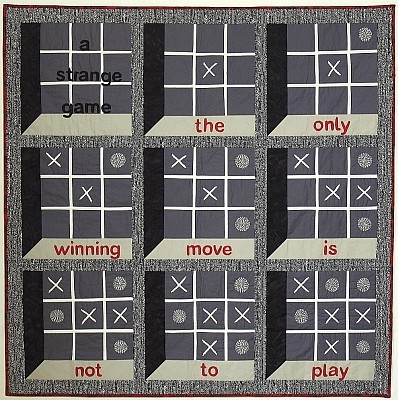 |
A strange game By: Frauke Schramm, Germany I am fascinated by the movie “Wargames” – remember the computer Joshua playing and learning? My hand-stitched circles and crosses were fun to do – and the thread-painted writing (done by machine), too! Quilt size: width: 40" height: 40" |
 |
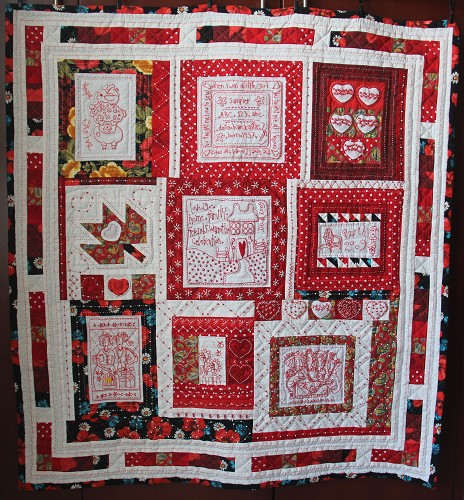
Aurifil Threads Free Embroidery BOM 2012 By: Gale Lavers, Newfoundland and Labrador, Canada Talented designer shared free patterns for a mystery embroidery quilt. I enjoyed stitching each block and my inspiration fabric for color was the black plaid. Having only one two inch strip of it, I had to be careful and only use it once in each block. Love how it turned out. Thanks Aurifil Quilt size: width: 28" height: 36" |
 |
Babies Don’t Keep By: Eileen, Minnesota, USA I wanted this when I had babies, but couldn’t afford it. I found an unopened kit at a garage sale for $1.50 and grabbed it, intending to make it for my daughter when she had her 1st. I forgot about it when the time came, found it later, and made it into quilt for her birthday when baby was 1.5 yrs. Quilt size: width: 24" height: 16" |
 |
blanco y rojo By: maria jose gomez, Spain Sewing machine cover to protect. applied with embroidery Quilt size: width: 18" height: 12" |
 |
Bridie Quilt By: Whit, Maine, USA
Quilt size: width: 59" height: 58" |
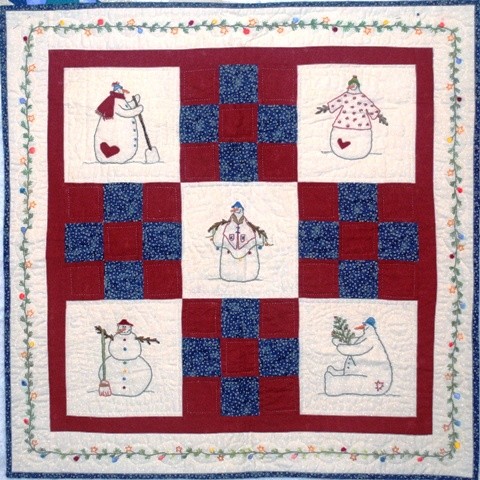 |
Celebrating Winter’s Snow By: Sandra White, Ohio, USA Hand Embroidered Blocks alternating with simple nine patch blocks. The Border is also hand embroidered and embellished with beads. Hand Quilted. Happy Snowmen celebrating winter. Quilt size: width: 36" height: 36" |
 |
Crazy Love By: Corina Jansen, Netherlands Crazy, pink and some love stories – the short description. The long one: a nice group of ladies were once in a Romanian quilt group, and they all made a one color crazy quilt for an exhibition in Bucharest. At that time my daughter loved the color pink…I spend looong hours on the embroidery:) Quilt size: width: 30" height: 30" |
 |
Dragonflies By: Pam in KC, Missouri, USA I used coordinating crayons and floss to embroider and color the dragonflies, then set them in a modified disappearing 9-patch. The backing has multi-colored dragonflies to match. I quilted the top using a black & white thread using a dragonfly motif. Quilt size: width: 57" height: 68" |
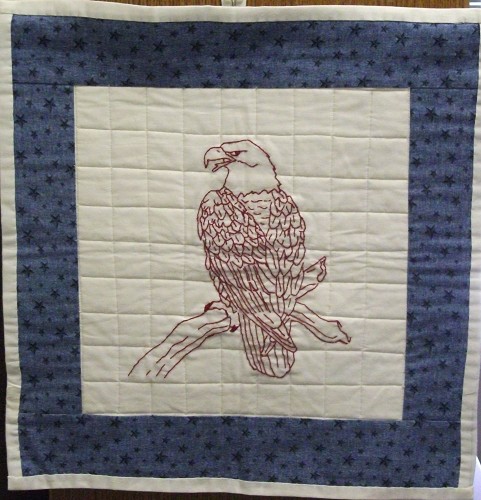 |
Embroidered Eagle By: Bonni Feltz, Illinois, USA This embroidered Eagle was my first redwork piece. I did it last year for my office and plan on doing more redwork embroidery. I bring him out every Fourth of July to watch over things. Quilt size: width: 16.5" height: 16.5" |
 |
Flowers and Birdies for Baby, Oh My! By: Theresa Litz, New York, USA This baby quilt (for a “some day” grandchild) was designed one step at a time. I used Dakota Collectibles machine embroidery designs (flowers and birds) in the pink blocks. Then I experiemented with coordinating fat quarters, playing and designing as I went along. Freemotion quilting completes it. Quilt size: width: 30" height: 40" |
 |
Friends at my garden gate By: Jeanne Zukowski, New York, USA Unfinished will be for twin size bed. This was so much fun to work on. Embrodiery Pattern by Betty Alderman Quilt size: width: 45" height: 84" |
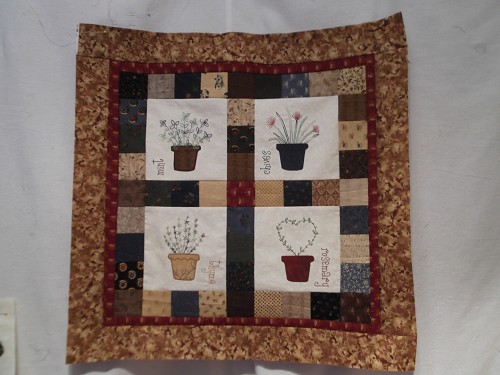 |
Herbs for Sharon By: Peggy, Quebec, Canada I saw this quilt/wallhanging in an Australian Homespun and knew that I had to make it for a special friend who loves to garden. I practiced all my quilting skills with the bulk of the embroidery. Quilt size: width: 24" height: 24" |
 |
In My Garden By: Anne Howes, Ontario, Canada I am 93 and I love my garden and all that lives within it. I embroidered this quilt for my daughter; the blocks are a 3×4″ and the designs are all original. I have embroidered and gardened all my life but I just broke my arm and don’t know when I will be able to do either. Soon I hope! Quilt size: width: 36" height: 44" |
 |
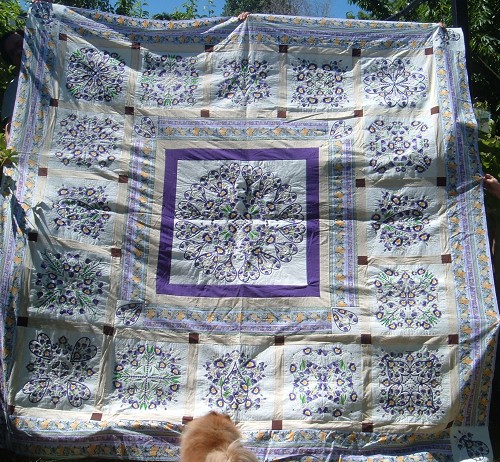
Just for me… By: Isabell, United Kingdom Over the past few months I have hand embroidered different sized pieces of White Dupion silk or white cotton fabric to form the basis of my quilt. Embellishments include, lace, ribbon, silk organza. Quilt size: width: 84" height: 90" |
 |
Latte Quilt By: Bunny, Ontario, Canada This is my first Machine Embroidered quilt. I made it in 2002 took me 6 weeks. Latte Quilt with Kerrie Hay had to make it..I machine quilted the quilt. Each block was several hoopings. To my surprise I won a blue ribbon at our Quilt Show. I was so surprised but enjoyed the excitement in the win. Quilt size: width: 100" height: 109" |
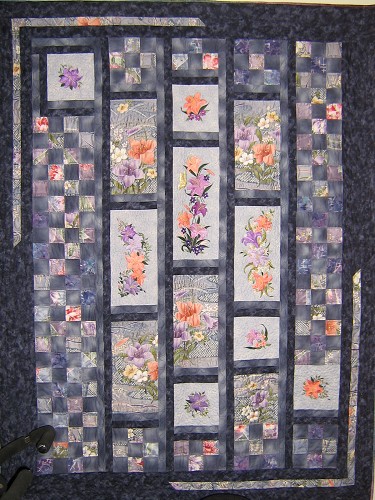 |
Lily Pizzazz By: LeAnne Law, Oregon, USA This is a Nine-Patch Pizzazz quilt that I added embroidery to the large blocks. I’d had the focus fabric for a long time and knew I didn’t want to cut it into tiny pieces and lose the flowers. The Hatched in Africa lily designs are a perfect match to the lilies in the fabric. Quilt size: width: 49" height: 64" |
 |
Mature Sunbonnet Sue By: Iret, Ontario, Canada This is my first redwork quilt. I hand quilted it as to avoid crossing over the embroidery work. The plain blocks have a quilted heart in the center. This quilt will go to my great niece on her 16th birthday. Quilt size: width: 45" height: 36" |
 |
Memories By: Brinda Crishna, India I made this as an wedding anniversary present for my daughter Nitasha and her husband Sujoy. I wanted to make her something special. I tried to capture bits and pieces of Kolkata, the city where we live and where she grew up. I love the combination of hand quilting and embroidery. Quilt size: width: 78" height: 90" |
 |
Merry Little Xmas By: Teresa Felgueiras, Portugal It’s a quilt made from a free BOM pattern by Gail Pan. I love pieced and embroidered or appliqued quilts and this was my first try at a mixed technique quilt. I hang it on my living room wall every Xmas since 2010. Quilt size: width: 36" height: 36" |
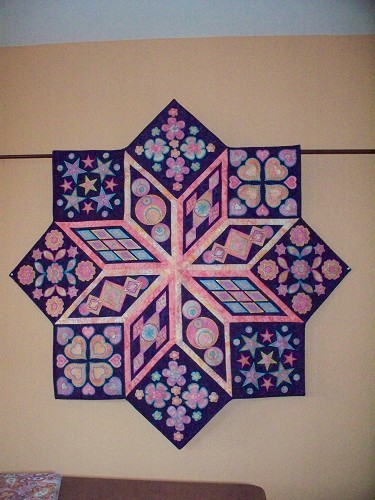 |
My Favorite Things By: Jacquelyn, Arizona, USA This quilt took a year to make. Each block was machine embroidered over applique. Then pieced and quilted. Taken from Sarah Vedeler’s Bedazzled design, I modified it by not adding borders. I love the star shape. It now proudly hangs on my entry hall. Quilt size: width: 55" height: 55" |
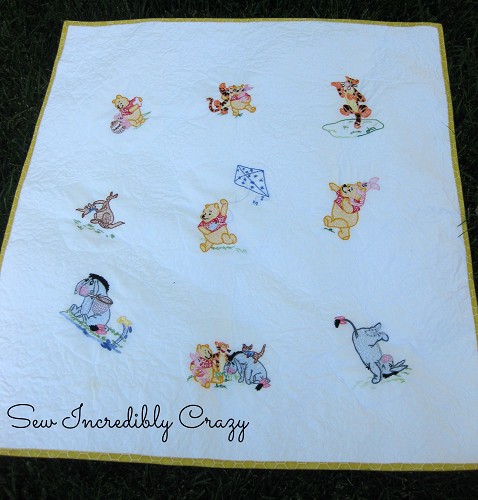 |
Oh, Sweet Pooh By: Amy @ Sew Incredibly Crazy, Colorado, USA My mother embroidered this sweet quilt that I quilted for her. She plans to make one for each of her grandkids to add to their hope chest. It will definitely be a family heirloom for many years to come. Quilt size: width: 36" height: 50" |
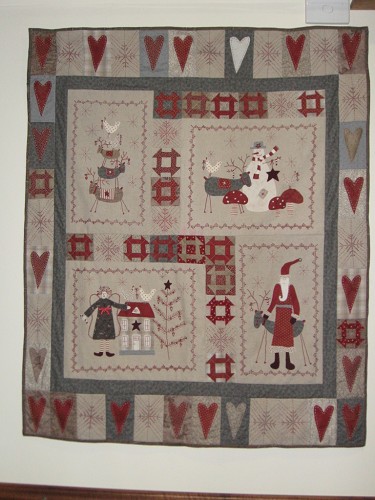 |
Scandinavian Christmas by Lynette Anderson By: Melanie Keen, Australia My first ever block of the month. Didn’t finish it until February but it has hung proudly in my lounge room since then Quilt size: width: 36" height: 43" |
 |
Sharman’s Vintage Garden By: Sharman’s Vintage Garden, Utah, USA This is a machine embroidery quilt that took approx 7 hours per block; center took approx 28 hours. I finished the quilt top about a year ago but do not feel that my quilting skills are good enough to do it justice. Once I feel more confident will quilt it. It is a Jenny Haskins design. Quilt size: width: 98" height: 98" |
 |
Simons Folly By: Ann Visser, Utah, USA I’m making this quilt for my sister. Lots of time and effort, but worth it. Quilt size: width: 94" height: 90" |
 |
SNOWMAN QUILT By: Jean, Ohio, USA This was hanging in a local quilt shop and it has machine embroidery snowmen, trees, mailbox, snowflakes, etc. on the quilt which also has pieced blocks. It is machine quilted. Made it for my granddaughter when she got married. Quilt size: width: 48" height: 48" |
 |
Snowy Days By: Rhoda Forbes, British Columbia, Canada This is the first embroidery quilt that I have done. I used two shades of brown and worked on it all winter. Quilt size: width: 66" height: 66" |
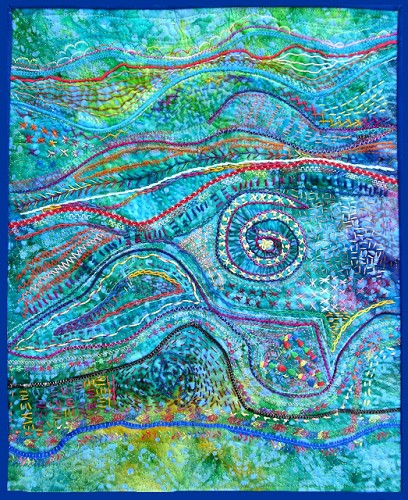 |
String Theory By: Gene Black, Alabama, USA Ths quilt is filled with energy and joy I learned a lot about hand stitching and more about the stitches on my machine in making this. Various areas were filled with hand stitches but also some machine stitches. Much like our lives, the combination, working together added strength to the whole. Quilt size: width: 14" height: 17" |
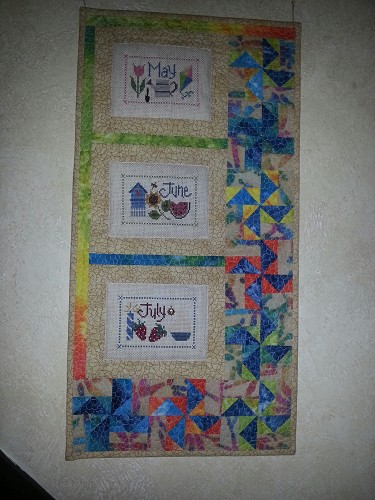 |
Summer Fun By: Ellen Bencken, Idaho, USA I purchased 12 cross stitch motifs in 2003 while attending a family reunion in McCall Idaho. I stitched 7 of them and then stopped. My quilting got me thinking that I could make 4 seasonal wallhangings for the staircase wall in our cabin. Voila! 2 done :-) Quilt size: width: 12.5" height: 25" |
 |
Truly Scrumptious By: Truly Scrumptious by Cinderberry Stitches, British Columbia, Canada This is one of the first hand embroidered quilts I have undertaken. All embroidery is done on dupioni silks. It is happy and joyful and whimsical and I love this quilt. It’s next on my list to quilt and finish. Quilt size: width: 55" height: 65" |
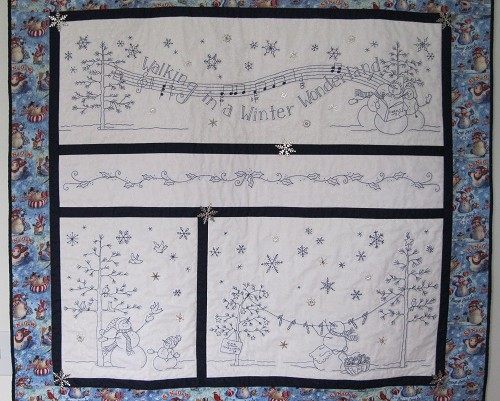 |
Winter Wonderland By: Teresa Weaver, Michigan, USA This is a redwork pattern that I did in blue because of the snowmen theme. I added a sparkly tulle overlay to make it look like it was snowing. The tulle was laid on each block, basted around the edges, quilted around the embroidery, then carefully trimmed away from over the embroidery stitches. Quilt size: width: 46" height: 44" |
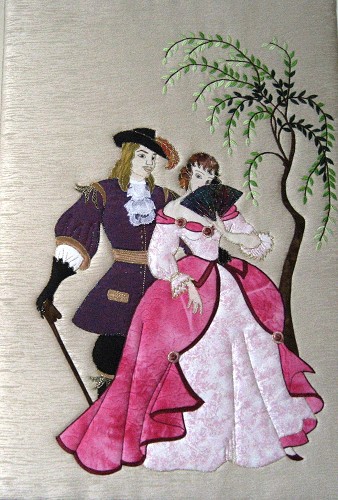 |
Young Lovers By: Jenny in NZ, New Zealand An old hand embroidery transfer of my Mum’s that I decided to work in applique. The tree branches and leaves plus all the embroidery on the couple I did using various embroidery stitches on my machine. Quilt size: width: 14" height: 22" |
My tip for accuracy is to mark my clear quilting rulers with painters tape.
A quarter-inch foot with the metal guide on the side is a must for accurate sewing for me. I could not live with out it (at least I wouldn’t want to!!!)
When I think embroidery, I always think of hand-embroidery but some of this machine work is pretty cool.
Always double check measurements before cutting.
I always use the quilting rulers. My 15″ x 15″ is my “go-to” tool for accuracy. Even though I have smaller ones, I always end up using the larger one to make sure everything is really accurate.
Using the 1/4inch foot is a great help!
Make sure the fabric doesn’t stretch when you get it to the ironing board. Press instead of iron.
Always measure twice, cut once.
Ironing and tripping after every step of piecing.
Square up your block sections as well as the completed block. It takes extra time, but your blocks will go together better & your seams will match up. Thanks.
Keep a small pair of scissors at your ironing board to trim threads. The tendency to “break” those threads distorts your blocks.
There’s a tool called ‘the Angler’ which is great for accurate piecing and seams :) It can be attached to your sewing machine very easily.
Lightly spray starch your fabric before cutting it to size. It dramatically improves accuracy and it minimizes (if no eliminates) fraying. I also like to starch as I piece. You can make your own spray starch for pennies a bottle!
I have a piece of Painters Tape on the bed of my sewing machine to guide the edge of my fabric for the seam allowance. If I need to change the needle position or stitch length, I can write on the tape if I will need to go back to the original settings.
Measure twice – cut once is the best tip from me. Too often I have caught myself just in time of making a wrong cut. This is true especially when paper piecing – I almost cut off the wrong part instead of making a 1/4″ seam in my trimming
Measure twice and cut once.
Thread thickness makes a difference in accurate piecing.
measure measure measure!
A quarter inch pressure foot it my best guide for accurate seams.
Nice sharp blade for your rotary cutter!!
Block when completed, it will help the overall look.
My tip would be to remember that quilting isn’t a race. Slow down, pedal to the metal doesn’t apply when piecing.
When piecing strips that require full (width of fabric) together for sub cutting, I always cut my strip in half before sewing. Less waving when I iron. You can lay one strip on top of the other and snug the opposing seams and cut once to get two pieces. Great for making four patches or nine patches.
Very beautiul Quilts. Love all the work everyone has done here.
JeanneZ
I like to go by intuition
Measure measure and then measure again. And what it closely….and I am still no good at it..lol…
My quilts seem to go together best-when I have a fresh blade in my rotary cutter and a nice flat groove-free cutting mat.
This one’s not a new one, but an old one and a good one: Measure twice, cut once.
Deborah
pinkscissorsdesign@ gmail .com
For accuracy I cut with my Accuquilt Go! whenever possible!
I only cut out a few blocks at a time. It is a little slower but, if I’ve made any mistakes, I haven’t wasted a whole quilts worth of fabric, just a few blocks.
Sew straight seams.
I do have a question to being more accurate. I do a lot of FMQ and I realized I have a hard time coming back on the same line when I’m backing out of a design. I would really appreciate any suggestions on how to make it look like I can’t follow a line ( which apparently I can’t). Thanks.
Frequently change the rotary blade. Invest in a variety of great rulers so you have what you need.
press, press, press
If I start with a ruler, I continue with the same ruler through the whole project. Even if two rulers come from the same company, I have seen a tiny bit of difference between the two. I also use a 2 ply 50 weight thread for piecing. It’s just as strong and doesn’t take up the same amount of room as a 3 ply 50 weight. (And yes, I can tell the difference by feeling the thread)
Pressing at every step, before cutting fabric, every seam allowances and final assembling is my best tip.
My tip is to take things nice and slowly :-)
do the best you can and be satisfied with that :)))
For my accuracy I make sure my 1/4 inch seam is the same on all the blocks or it will not fit, also make sure they are cut properly by using the proper cuttiing ruler and a good blade.
I was going to enter in this weeks contest because I have our Family quilt and pillows that could have fit this category and I forgot !! All of these are great ones ,I hope the best one wins
never cut fabric when you have migraine as it will drive you crazy the next day trying to figure out what you did.
Never cut fabric if you are tiered or not feeling good :-(
I use a die cutter to improve my accuracy in cutting and the stitching follows right along.
Do not use steam when pressing your pieced blocks. The steam may distort or stretch the blocks, especially those with a lot of bias.
When machine piecing, I always use a scant quarter inch
seam. I have found this to be the best way for me to achieve accuracy .
My accuracy tip is to make sure you square up blocks before assembling a big block. It will go together so much easier.
I mark my ruler with some tape if I’m making the same cut many times.
My tip is to check your quarter inch foot is accurate.
I set my needle one step off center towards the edge as after seams are pressed they take up that tiny fraction
Measure twice, cut once! Learned that in my first quilting class & it’s in my head every time I line up my ruler!
Awesome quilts this week – hard to choose but for sure “In My Garden” has to be the winner. I’d like to meet that “young” lady!
I always use the same scant 1/4″ seam ruler (with a hole to place my needle in as a guide) and then use my seam guide attachment or tape on the sewing machine to guide my fabric by. Doing this means I can go from one sewing machine to another and work on the same quilt top and always have a perfect seam allowance and everything fits together beautifully.
I usually go by the rule measure twice and cut once because it is so easy to think you are being accurate and then find out you are off just by a little bit. Checking my measurement again before I have actually cut has saved me a few times from cutting my fabric slightly too small.