Quilting Gallery
michele@quiltinggallery.com
http://QuiltingGallery.com/

Logo: Quilting Gallery

Join the Quilting Gallery page on Facebook Follow MishkaOttawa on Twitter Join Quilting Gallery Flickr group Follow Mishka on Pinterest My pattern store on Craftsy Follow Quilting Gallery on Bloglovin RSS feed for Quilting Gallery blog Subscribe to the Quilting Gallery newsletter

Inspiring quilters' creativity, sharing ideas, making world-wide connections and having fun.

Quilting Gallery Blog

Beginner’s Quit-Along – Quilt Top Assembly

Beginner's Quilt-Along

Hi everyone! My apologies for being so late with today’s post … it is still Thursday. *sigh* One of those days/weeks when things definitely don’t go as planned. My brain is a little mushed right now, but hopefully this post makes sense. If I’ve missed anything, please don’t hesitate to ask for clarification.

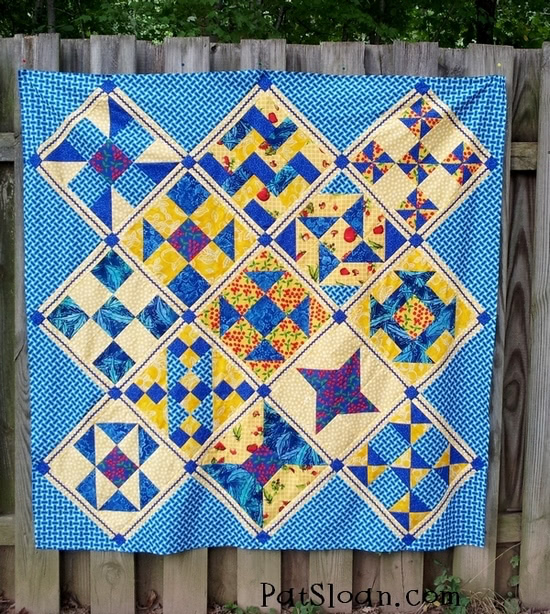
The time has finally come to put our quilt blocks together. Below, I’ll be sharing how to assemble the straight layout, while Pat Sloan has put together an excellent tutorial for the on-point layout. She added a FUN twist with ric rac that I think it absolutely gorgeous. She surprised me too!

Pat Sloan QAL on point Final

If you’re new here, you can find all the info and links to the blocks on the Beginner’s QAL page. The tutorials will remain on this site indefinitely. I’ll also be putting together a PDF booklet that will be for sale toward the end of September. This booklet will include the block tutorials, beginner’s lessons & resources and recommended products.


Beginner’s Lesson

shape-cut-ruler

Before I get to today’s lesson, I want to share with you another favourite tool of mine. It’s fantastic for quickly and accurately cutting strips of fabric. It’s the Shape Cutâ„¢ Ruler by June Tailor. Here’s a video showing how it works:

I have one to give-away for a grand prize at the end of the month.


Preparing to Assemble the Blocks

Before we get started, the first thing you want to do is give all of your blocks a good press and if necessary square up your blocks so that they are all the same size. I like to spray my blocks with Best Press and set them aside to dry almost entirely. I don’t want them sopping wet when I go to iron them or they’ll scorch. You can use other spray starch or a spritz of water too. If using a heavy spray starch, it might be best to spray the block from the backside and let it soak through to the front.

Now you’ll want to measure all of your blocks and determine if they are different sizes and/or if they need to be squared up. For my blocks, I was careful to measure them as I went and that they fell within 1/8″ of 12.5″ already. Within that error of margin, you can ease them together with your sashing.

As trimming and squaring up my blocks isn’t something I really do, I’ve included Vanessa’s fantastic video tutorial for those that want/need to do this step.

For those of you that are true beginners, my best advice is don’t stress over it. Sashing can hide a multitude of sins. Remember that what you trim can’t be added back, so be careful and gentle and only trim if it’s truly necessary.


Assembling the Quilt Top

Let’s get started with a bit of terminology courtesy of the graphic Pat did for an earlier Learning Center post:

Pat Sloan block construction with notes

To assemble our quilt blocks, we’ll have sashing and cornerstones surrounding the blocks, then a thin inner border, followed by a larger outer border. Those doing the on-point layout will also have setting and corner triangle units.

The next parts of this tutorial refer specifically to the straight layout, others will refer to Pat’s on-point layout.

You’ll need to select the 12 blocks you want for your quilt. I chose to eliminate Block 2, and will use that on the back. Below is a photo of my chosen blocks in order. I pin a scrap of paper numbered with each block so I don’t get them mixed up.

family-portrait

Cutting Requirements for Sashing and Cornerstones

We’ll cut our sashing, cornerstones and both borders from yardage. Each strip referred to below is cut from selvedge to selvedge. If you need a refresher on cutting fabric, see some of our earlier Beginner’s Lessons within the block tutorials. Also, I always starch my fabrics with Best Press and iron well before cutting.

In total, we need (31) 12.5″ x 1.5″ sashing units. From each strip of fabric, we get 3 strips of sashing. So, 31/3 = 11 (rounded up) strips. You’ll need 16.5″ of fabric (i.e. 11 x 1.5″), but I always round up to be on the safe side, so start with a piece that’s 20″ and then cut the (11) 1.5″ strips. Sub-cut these longer strips into the (31) 12.5″ x 1.5″ sashing units.

For the cornerstones, we need (20) 1.5″ squares. You can get 26 squares from one strip of fabric cut selvedge to selvedge.

You’ll have:

(11) 1.5″ strips for sashing, sub-cut into (31) 12.5″ x 1.5″ units
(1) 1.5″ strip for cornerstones, sub-cut into (20) 1.5″ squares

Sewing the Rows

For a quilt of this type (and most quilts for that matter), we’ll assemble the top first into rows, just as we did for our individual blocks. We’ll have (4) rows of blocks with 3 blocks each and (5) rows of sashing strips containing (3) sashed strips and (4) cornerstones each.

For the quilt block rows: attach a sashing strip to both sides of the outer blocks, leaving the middle blocks without any sashing. Set your seams and press with a hot iron toward the sashing strips, i.e. away from the blocks. Next, complete the rows by adding the middle blocks to the side blocks that have the sashing.

Trick: I sew with the sashing on top, 95% of the time. However, if I find that my block is slightly smaller, i.e. within that 1/8″ margin I talked about above, then I’ll put the sashing strip on the bottom and allow the machine to ease the two pieces together. You may find that your block edges are a bit ragged, it’s OK, pin your sashing as straight as you can to the block and follow the edge of your sashing strip when attaching it.

For the sashing/cornerstone rows: attach cornerstones to both sides of ten (10) sashing strips. Press toward the sashing strip, i.e away from the cornerstone units. Then finish these rows by adding in the remaining five (5) sashing strips in between previous sashing/cornerstone strips.

Here’s what you’ll have:

rows-sashed

Assemble the Top Centre

Now that the rows are complete, attach a sashing/cornerstone strip to the top and bottom of rows 1 and 4 and to the bottom of row 2. Row 3 doesn’t get any sashing attached. Nest your seams where the cornerstone and sashings come together. Pin, pin, pin… it’ll help keep everything nicely aligned. As much as possible, follow the straight edge of your sashing strip when sewing together.

sashings-attached

Next, sew rows 1 & 2 and 3 & 4 together. Pressing each row toward the sashing strip as you go. Finally, sew rows 1/2 & 3/4 together to complete the top centre.

sashings-complete

Stand back and admire your work! You’ve come a long way!!

Borders

Here’s an excellent tutorial by Deb Geyer on adding borders. Yes, you’re going to need to get out your measuring tape and make note of your quilt top size. Now, I’ll probably annoy many out there when I say this, but when I attach my borders, I measure, but I also allow a bit of fudge room, and I pin, pin, pin like crazy then lop off what I don’t need. Works perfectly every time for me.

Our first border finishes at 1″, so we’ll be cutting 1.5″ strips. We’ll add the side borders first, and they need to be about 54″ long, including seam allowance. Once the side borders are added, the top and bottom borders are about 43″. Again, measure your own top and figure out what you need. For those doing the on-point layout, your side borders will be about 59″ and add 2″ and your top and bottom borders will be about 61″. Press the seams toward the border, away from your quilt top centre.

When calculating how many strips of fabric I need for the borders, I always assume my fabric is 40″ wide. Some fabric is a bit wider, but that’s a safe measurement. We need to join strips together to get the length and width we need for the borders. Let’s do some math:

54″ – 40″ = 14″ + 0.5″ for seam allowance
43″ – 40″ = 3″ + 0.5″ for seam allowance

So, I know I need four full strips at 40″ (two sides plus top & bottom), plus one strip sub-cut and added to the others to get the required length needed. What I did was sub-cut the two 14.5″ pieces first, and then what was left over (~11″ cut in two at 5.5″) I added to the top and bottom pieces strips. The 40″ + 5.5″ added is for the top and bottom borders is a couple of inches larger than required (~43″). I added more than needed as I didn’t want there to be just a tiny seam at the edge.

For the straight layout, cut 5 strips at 1.5″ for the inner border.

For the on-point layout, you’ll need to measure your top and the amount of usable yardage that you can get from selvedge to selvedge. You’ll need at least six strips, possibly more if it’s a bit short. Contact me if you’re having trouble figuring it out.

The outer border is cut at 6.5″. For my top, I cut six strips, two of which I cut in half and attached to the other four pieces. I had lots of extra length, but it was a good starting point. Once the inner border was attached, I re-measured and cut the large borders to the length required (plus a bit of fudge room).

As you did for the inner border, attach the sides first. Press toward the outer border. Then add the top and bottom borders.

When attaching the wide outer borders, you’ll want to pin the other edge that you aren’t sewing to the top so so that it doesn’t shift or flop around on you. You’re moving around big pieces of fabric and they can easily come unattached or shift. This isn’t necessary for the smaller borders. I find anything over 4″, it’s a good idea to pin down the other side.

pinning-borders

Tip: When joining the outer border strips together to get the required length and when attached the final border, always back stitch your seams. The final quilt top will get a lot of handling while basting and quilting and you want to make sure those seams don’t come apart before you secure them with the binding.

My final quilt top:

finished-top

It looks a lot better in real life. The lighting in my apartment stinks for taking photos.

Download this week’s tutorial here

If you need help in choosing your sashing, cornerstone and border fabrics, upload some examples/ideas to the Flickr group and we can all chime in.


Next Week and Grand Prizes

Next week, I’ll share some tips and resources for creating the back for your quilt, basting, binding and adding a label. In the meantime, some homework! Over on Craftsy, there’s an excellent free video called Creative Quilt Backs from Elizabeth Hartman. I watched this the other day, and was most impressed with how well it was done. I certainly learned a few new tricks myself. I strongly recommend you watch it. The first few chapters I would consider aimed at the beginner, while the latter ones are a bit more advanced, but still inspiring.

creative-quilt-backs

As discussed on Flickr, the grand prizes will be awarded by votes from the community that visit this web site, similar to the weekly quilt contests. To be eligible, you only need to complete the top of your quilt, including both borders. In next week’s post, there will be a link where you can submit your quilt top for voting purposes. You’ll have until September 30th to enter. Full details next week.


Block 13 Winners

I’ll update this page in the next couple of days with the Block 13 winners.

Important Notice: Google Reader will cease to exist on July 1, 2013. According to my stats, this will impact 75% of the readers that follow my blog via RSS. That's significant. Please consider using one of the alternatives I have suggested. I'd hate to lose you.

Stay connected: Subscribe to our Weekly Newsletter

Take an Online Quilting Class:

Online Quilting Class

Join the discussion!

9 Responses to “Beginner’s Quit-Along – Quilt Top Assembly”

  1. Gene Black says:

    Yaay! I hope to have one of my quilts actually quilted in time to enter it.

  2. Betsy Pinkerton says:

    Same here Gene ! I have to do some traveling in the next 10 days so I’m hoping I can get my quilt top put together. This has been a great experience & I do believe I’m hooked!
    Looking forward to seeing all the finished quilts :-)

    Betsy

  3. crystal says:

    Still working on my blocks, Having alot pain the last couple weeks in my shoulders. I have them all cut out finally and a little sewing done.

    Maybe i will still make it to getting finished on time.

  4. hafza says:

    I am far behind…still have five blocks to complete before I can sew all together. Hopefully my sewing machine is ready by next week.

  5. Melanie says:

    I am behind as well, as I have had some issues going on here… and I started a new job yesterday… I hope to catch up soon…

  6. Rumeysa says:

    I wish I had made two sets of blocks, one for on-point layout and one for standard layout.

  7. sandy says:

    Hi Michele:
    Wondering when you are going to post the finishing instructions or should I just follow the instructions on the wonderful tutorial from Craftsy?

  8. Clare says:

    This is my first quilt, and I think I’m hooked too. I joined late, but I’m ALMOST caught up – just have to finish attaching the borders. Hope the finishing instructions get posted soon!

  9. Clare says:

    Are you really just going to leave me hanging here? I guess I can look up finishing directions somewhere else, but was hoping to finish my quilt with directions from here. Up till now, all the directions have been great. Please…..?

Comments are now closed for this blog post. Contact me!