Beginner’s Quilt-Along: Block 2
Hi everyone, welcome to Block 2 of the Beginner’s Quilt-Along (QAL). It’s Michele here and I’ll be teaching you how to piece the 13 blocks for the QAL. Pat Sloan will be quilting along with us on her blog, posting her version of the blocks and sharing a few tips too. Here’s Pat’s take on Block 2. The QAL blocks will be published here on the Quilting Gallery each Thursday morning. See the main Beginner’s QAL page for more information and additional links.
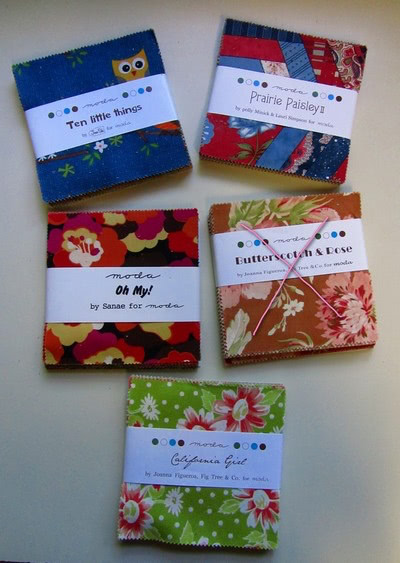
Don’t forget to upload your completed block to the Flickr group each week. This week, we have a lovely charm pack from Moda to give-away to one of you. Winner will be selected randomly from those that completed the block and the winner gets to choose from one of these (except Butterscotch and Rose):
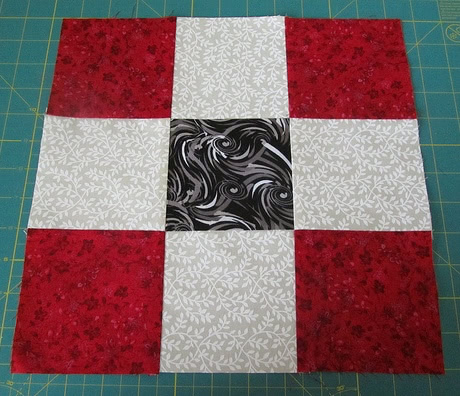
Congratulations to the winner of Block 1 – Play a Game of Hopscotch, Karen (kvl2012). Here’s her block:
Also, congratulations to Sherry who won the Reliable iron for sharing the quilt-along on her blog.

Block 2 – Peek Over the Fence

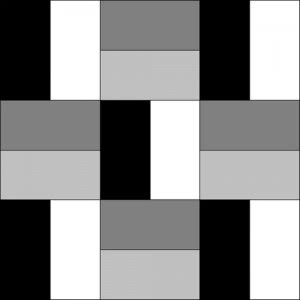
Our second block is Peek Over the Fence. I wasn’t able to find an original name for this block in Jinny Beyer’s The Quilter’s Album of Patchwork Patterns, however, this block came from Electric Quilt and they named it Two by Three. It is very similar to a rail fence block that is made with 2 or more patches in each block unit.
Here’s a Mosaic of photos from Flickr featuring the rail fence. You can click the links underneath to see the full image on Flickr.

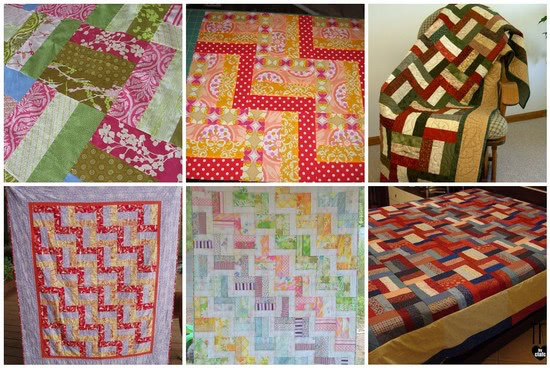
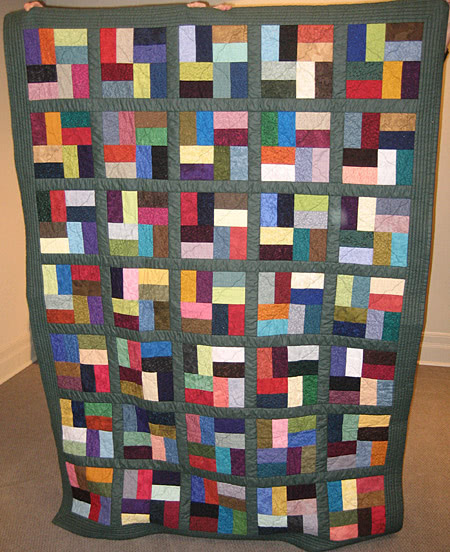
I made a similar quilt using a 2×2 grid called Sidebars. This quilt used charm packs and was donated to charity. The 3×3 grid of our block would be perfect for a quilt made with a jelly roll.
A note about block colours: I am presenting all blocks in our quilt-along using black & white and shades of grey. If you’ve chosen to use a background fabric for your blocks, it’s up to you if you want your background fabric to be the white or black represented in each of the block diagrams. Our block today uses four different fabrics, and does not have an obvious background. You decide which colour in the diagram you want to use for your background colour. It really doesn’t matter, just be consistent throughout the block, so as not to lose the design.
Beginner’s Resources
Here are this week’s beginner resources to help improve our skills:
A series of tutorials on Rotary Cutting from the Purl Bee.
Bonnie from Quiltville talks about different rulers, the lines on them and perfecting your cutting in Making the cut!. I agree with her 100% and can’t stress enough how the rulers that you use make a big difference. Rulers with thin, easy to read lines are best.
Pressing seams – there is a debate on when to press seams to one side and when to press them open. Here’s my take, until recently I always pressed my seams to one side, never open. I’ve recently changed my mind about this and now take into consideration the overall design to determine when I’ll press seams open. If the construction of the block will have nesting seams, then I always press to one side. If there are no seams to be matched in the next stage of construction, I’ll press them open.
Here are a few links for you to explore more about this topic:
- Jackie’s Seams… The Burning Question… Press Open or To One Side?
- Sew, Mama, Sew’s Quilting Basics ~ The Quarter Inch Seam & Pressing Techniques
- Mabry Benson’s Why You should Press Your Quilt Seams Open
- Leah Day’s Pressing Seams
This week’s block has seams pressed open but only for the strip pieced units, not when constructing the actual block itself.
Here’s a great video on pressing your 3-patch row units:
Tutorial: Block 2 – Peek Over the Fence

Please read all of the instructions before cutting your fabrics.
You need:
Cut: All strips 2.5″ by width of fat quarter (~20″) – see notes below
(2) strips black
(2) strips white
(1) strip light grey
(1) strip dark grey
When cutting fat quarters:
Fat quarters usually measure 20″ wide. For the black and white squares represented in this block, you actually need a strip 22.5″ wide. Therefore, if cutting from fat quarters, you’ll need to cut two strips for the black and white blocks. From the second strip of both colours, sub-cut a 5″ piece before piecing. Here’s what you should have:

In my photo, the top yellow is black, the flowered print with blue background is white, the other flower print is light grey and the blue swirl is dark grey.
Piecing the block:
When creating quilt tops, we always sew with a 1/4″ seam allowance and with our fabric right sides together (RST), i.e. pretty fabric fronts facing each other. Here’s a great tutorial on creating an accurate 1/4″ seam.
Piece your strips together and press your seams open (refer to resources above). Don’t worry if your strips don’t align at the short edges perfectly, this is normal.

From your strip sets, you’ll need to sub-cut into (5) blocks of black/white and (4) blocks of light/dark grey. Cut these units at 4.5″. Align the edge of your ruler with the bottom of your strip set.

In the photo, you’ll see that on the left side, my strip set extends beyond the 4.5″ mark on my ruler. This is on purpose! You want to make your first cut from your strip set larger so that you can remove the selvedge or raw edges from the left side. Make the first cut, turn the cut piece around so that the selvedge/raw edge is on the right and align the good cut edge exactly at the 4.5″ line on your ruler and cut to remove the selvedge/raw edge. The remaining cuts from your strip will be lined up exactly at the 4.5″ line on the ruler:

If you are left-handed, you will need to reverse the instructions above. Here are the nine sub-cut units:

Lay out your units into the block following the block diagram.

It’s EASY to get confused when piecing this block. You’ll see in the photo below that I have used pins in the bottom left corner of each row so I don’t get them mixed up. I added these after I took the layout photo above but before I started piecing the units to make the rows.
Stitch your units together in three rows. As we did for Block 1, press the top and bottom rows towards the outside of the block, and the middle row towards the center block. This will allow us to nest our seams.

Sew rows 1 and 2 together, pinning at the seams and ends to keep things aligned nicely. Use as many pins as you need!

If you find that you are having difficulties getting your seams to nest nicely, stick a pin on both sides of the seam allowance as shown in the photo:

Press the seam towards row 1, then attach row 3.

Press the seam towards row 3. Your completed block should be 12.5″:

Final pressing:

I have created a PDF file for the block tutorial. Download it here: Beginner’s Quilt-Along – Block 2
Any questions, please don’t hesitate to ask in the comments. Don’t forget to share your completed block in the Flickr group by next Wednesday, June 20 for a chance to win this week’s give-away.
UFO Busting
Join the fun – Pat’s hosting a UFO Busting weekend!
Important Notice: Google Reader will cease to exist on July 1, 2013. According to my stats, this will impact 75% of the readers that follow my blog via RSS. That's significant. Please consider using one of the alternatives I have suggested. I'd hate to lose you.
Posted: June 14th, 2012
Topics: Free Projects, The Learning Center, Tips and Tricks
Tags: Beginner's Quilt-Along


I’m so excited to be doing these Michele! And you posts are amazing… great job!
Actually I made two of these blocks and plan to use extras for a second donation quilt. Thanks for spurring us on with some fun and easy blocks.
[...] http://quiltinggallery.com/2012/06/14/beginners-quilt-along-block-2/ [...]
[...] Join the FUN .. Block 2 of our Beginner’s Quilt-Along is now available. Get it here: Block 2 – Peek Over the Fence. [...]
I want to join with you girls to make these blocks but I don’t know how to put pictures on the computer. Also where do I sign up at? I’ll be waiting to hear back from you. Thanks. Nancy
Hi Nancy,
No sign up required. Visit this page for all the info then links to fabric requirements and our first two blocks as well as the Flickr group.
http://quiltinggallery.com/learning-center/beginners-quilt-along/
Hopefully, someone can teach you how to upload photos, but no worries if you can’t do it. It’s not required to participate in the quilt-along. You can still join Flickr and chat with the others.
Cheers,
Michele
Just to tell you that this is fun! I’m using these psychodelic charms with white backgrounds…it looks “groovey”…. Uh oh, i think i’m having a flashback to the 60s. Thanks for the great quilt along!
Hi Michele:
My blocks are turning out just a little over 12″ and I still need to trim them. So will this matter in the end? I’m really enjoying this “quilt a long” but I’m finding it a bit challenging to have everything match up.
Hi Michele – thanks for the Quilt-along. I have just joined the group and have caught up by doing the two blocks. I am looking forward to the next one.
I have added the blocks to the flicker group and blogged about it on my blog.
i did it! this was a fun block! thanks – flickr pic it up too!
Me parece fantástico este edredón y las explicaciones para hacer unos bloques perfectos. ¡Gracias, Michele!
[...] block is a combination of Block 2 and Block 3. I did not take detailed photos of each [...]
[...] Blok 2 [...]
[...] create the (5) 4-patch units, first strip piece the 2.5″ strips together, as we did in Block 2. We need these 4-patch units to finish at 4.5″ square. You’ll want to use an accurate, [...]