Please join me in welcoming today’s guest blogger Kim Hanson. Kim’s sharing photos and details on her new home office quilting studio. She’s also giving away a copy of Creating Your Perfect Quilting Space, by Lois Hallock. See below for how to enter.

Good day everyone. Thanks to Michele Foster, I have another opportunity to speak with you again. I’m so excited to write about my brand new home office quilting studio. Well, it’s not exactly "brand new", but it is revamped and so, so much better than what I had before.
Once our three adult children left the nest, I was beside myself with anticipation! I now had the entire, developed basement to use as my quilting workspace. What a joy, I thought, to have so much space to spread out in. My husband had purchased me a fabulous quilting table for Christmas and I was all set to go. We put together my new table – I’d certainly be able to free motion, machine quilt to my heart’s content on that baby! Woo-hoo. I set up a desk for my computer, put up a few bulletin boards as "vision" boards, used bookcases to store my quilting books and my folded fabric and I was ready to roll.
Dreaming of colour schemes and fabrics, the next day I made my way to the basement. Hmmmm…..I thought – light seemed to be coming in through the tiny windows, all the ceiling lights were on, but it was kinda dark and even a little foreboding. I repurposed a few household lamps, placing them strategically around my workspace and told myself it would all be good. It never was.
I worked in the basement for several years before deciding a move upstairs was a must. Most nights, I went to bed, closed my eyes and reconfigured different rooms in our home, trying to "picture" my new workspace. I finally set my sights on our under utilized living room and dining room. We had family Sunday dinners in the dining room most weeks, but the living room wasn’t used much at all.
So, after convincing my husband my idea was darn good, he and our eldest son hauled "my operation" up from the basement to the dining room. The living room furniture was moved mostly to the basement, and the dining room furniture was repositioned into the living room. Such a fabulous decision I must say! I could not be happier. Now, natural light comes streaming into my workspace every day, I can watch the neighborhood squirrels frolic in our backyard, and most importantly, I can now see the UPS man delivering my fabric!

Here’s how I planned out my new workspace:
Using graph paper, I drew a room plan for converting the dining room to a home office quilting studio. First, the new space was measured (13.4’x11.8′) and then three separate stations were configured into that space. Station A – cutting table; Station B – sewing/embroidery machines; Station C – computer/printer; Station D – fabric and more storage. Since the space in the dining room was limited, I combined Stations A and B together.
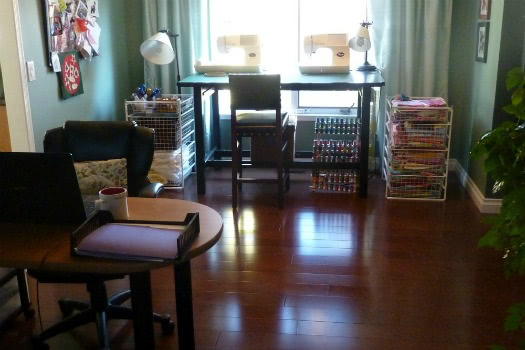
Stations A and B – The cutting table that I use is an old drafting table that my Dad used in his business eons ago. I sanded, primed and painted it black prior to moving it upstairs from the basement. It’s a fairly large surface (5’x3.2′) so it accommodates two fabric cutting mats and both of my Brother sewing and embroidery machines. A bar stool purchased from HomeSense allows me to sit at the drafting table and see outside to the backyard when I’m working at my machines. At night, I turn on both lamps and my workspace is comfortable, cozy and well-lit.
On either side of the drafting table, there is some fabric storage – IKEA-style wire baskets that are very versatile. On the left hand side, I have all my sewing accessories contained in old Starbucks tea tins – fabric cutter, scissors, pinking shears, marking pencils, etc. which are easily accessed when the need arises. On the floor beneath the drafting table, there is a thread rack which holds colourful machine embroidery threads. Since I am a quilt designer and a freelance writer, I need to maintain some files, and a wicker basket file box sits under the drafting table with all my files in one handy spot.
Surprisingly, my very aged Home Depot computer table works well in the new space and holds both my laptop computer and printer easily on its surface. The table faces towards the living room window allowing me to keep tabs on what’s happening outside (ala the cute UPS man!). Tucked into a plastic three drawer cart on wheels beside the computer table, is paper and envelopes, camera, chargers, printer ink – all very easily accessible. I have one of my quilts hanging near my desk – it was recently featured in Quilter’s Connection magazine and some prints and artwork that I love, on the walls.

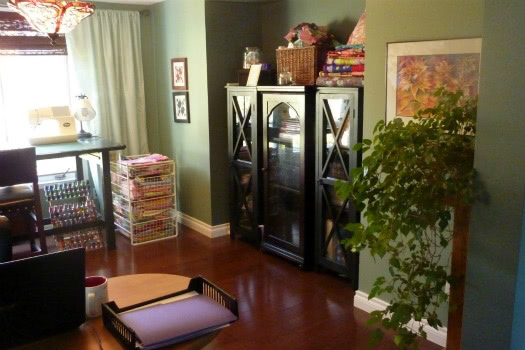
Station C – is more storage. I was fortunate to find three coordinating, inexpensive glass door cabinets at HomeSense which fit the alcove in the new workspace perfectly. (I just love HomeSense!) More fabric, bobbins, threads, cording, ribbons, strapping, pattern books, etc. are in the cabinets. Even with the glass doors, the items inside seem to be hidden from view. The ironing board conveniently folds up and fits neatly beside the cabinets.
Adding a living green plant and design board gave my new workspace some much-needed feng shui.

My new workspace is now very open. There is no door to close. Now, when someone appears at my front door they are easily able to see into my creative mess. I found a way to hide my "creativity" at Pier One…a vintage room divider that I can easily pull across in front of my computer table to camouflage what lurks beyond.
So basically, for a few hundred dollars, an under-utilized living room and some sweat equity, I am now so fortunate to have a workspace that I love.
Give-Away
I will be giving away this great resource – Creating Your Perfect Quilting Space, by Lois Hallock. To win, post a photo of your quilting space to my Kim Hanson Quilts Facebook page and one lucky winner will be chosen! Good luck everyone. You have until the end of January to share your photos to be eligible for the give-away.

Kim, if I would send you a picture of my sewing space at this moment, you would probably faint… lol the reason is that I had to put tissue paper on the back of a quilt I was quilting for a friend. It made such a mess!!! and I didn’t have time to clean it yet. so in the meantime, I have to let you know how I like your sewing space! It looks great.