
Greetings Everyone! My name is Ebony Love, and I am the owner & artist of LoveBug Studios. I started my business about 4 years ago, and focus on custom quilts and other items. I really love trying out new techniques, one of which is my topic for today. I have also started blogging recently, which is what brought me here, and I’m really excited to be a guest blogger and share with you my process to incorporate silk flowers in your quilts.
The Tools of the Trade
If you’re like me, somewhere in your house you have a vase full of fake flowers. If you want to bring new life to those flowers, don’t rearrange them, take them apart and use them in your quilts! I am sure there are books galore on this particular topic, but I’d like to show you a very easy way to do this with very simple tools you probably have laying around the house.
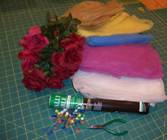
In addition to your regular quilting items (machine, needles, iron, scissors, etc.) I recommend the following tools:
- flat head flower pins (you’ll do a lot of pinning)
- a pair of pliers (to help take apart the flowers)
- iron on stabilizer or fusible batting
- a glue stick (not shown)
- tulle in assorted colors
- silk flowers
Separating the Flowers
Use the pliers to help you remove the plastic pieces from the flowers. One flower will give you many pieces to work with, even with different numbers of petals on each piece. This picture is an example of one flower that was taken apart – I got three 4-petal flowers, one 5-petal flower, and one 6-petal flower. When you take the flowers apart, they may not lay flat; simply press them between 2 pieces of muslin with your iron on a medium setting. (The muslin protects your iron in case there’s any plastic or residue on your flowers.)
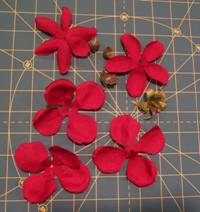
You can also use the leaves from the silk flowers – just peel them off of the plastic "veins" – they come off pretty easily!
Creating a Flower Arrangement
Now that the flowers and leaves are separated, you will need to figure out where to use them. I have chosen to "repot" my silk flowers into a new vase. To start this project, I used a fat quarter layered on a piece of fusible batting (fusible side down.) I use a few pins just to hold it in place while I work.

Next, you need to come up with a vase. I experimented with cutting a design from a sheet of paper before I cut my fabric. You can get a symmetrical vase by folding the sheet of paper in half & free hand cutting a design on the non-folded edges. Once you are happy with the design, use your paper vase as a template to cut from the fabric. To hold the vase in place temporarily, swipe the glue stick on the back of the vase in a couple of places and position it on the fabric (not too much!) Now the real fun begins!
Take some of the larger leaves from your silk flowers and position them above the vase. They don’t have to connect to anything because you’ll be covering them with flowers.
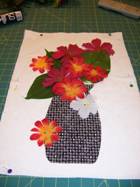
Take your silk flowers and scatter them over the leaves. Keep playing until you come up with a design you like. You can even take the glue & swipe the back of a petal or two to keep the ones you’re happy with in place. Don’t worry about the holes in the centers of the flowers – we’ll get to that!
Preparing for Quilting
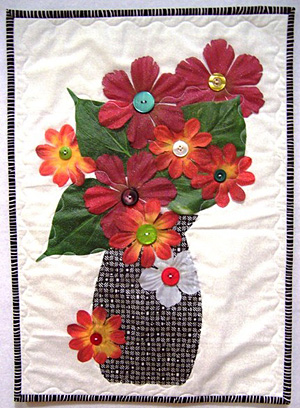
Once you are happy with the design, you want to have a layer of tulle over the top of your arrangement. I have found that if you choose a tulle that blends with your background fabric, it’s not as noticeable. In this design, I chose a silver sparkle tulle. If you want to experiment without ruining your arrangement, do this… position your design toward the edge of your table. Hold a piece of tulle in both hands in front of you, and trap the tulle between yourself & the table edge (so the loose end isn’t flapping around.) Lower the tulle toward the arrangement & get as close as you can without touching it. If you don’t like how that tulle looks, repeat with a different color. The tulle doesn’t have to match exactly, just close enough so it’s not distracting to the eye. If the tulle is really wrinkled, press it carefully with an iron on low to medium heat. Be careful with the iron – tulle will melt!

When you choose the right tulle, lay it down over the piece and start pinning! (Make sure you take any pins out from under the tulle – you don’t want to stitch them in!)
Pin each flower by inserting the pin through the center hole, through the layers of your tulle & fabric, and come out between petals. Try not to pin directly on the silk flower or the leaves because the hole left by the pin is nearly impossible to remove. Use a decorative stitch & the thread of your choice to stitch the flowers, leaves, and vase to the background & batting, removing pins as you go. You don’t have to stitch every petal – the tulle will keep the flowers from flopping around. Just stitch enough so the flower doesn’t move from your chosen spot.
Finishing the Arrangement
To finish your flower arrangement, fuse a backing fabric to the back of your quilt & finish it as you would any other quilt.
To hide the holes in the silk flowers, you can use buttons, beads, rhinestones, iron-ons, anything you choose! I chose buttons for mine, as you can see in the finished piece. Don’t be afraid to experiment!
Silk Flower Kit Giveaway
If you are eager to try this technique without the hassle of taking apart your own flowers, TWO lucky winners will get a kit with the instructions & materials you need to make this design. (Please note that the fabrics, flowers, leaves & buttons in your kit will vary from the design shown, but will be no less fabulous!)

How to enter: In the comments below, list three ways you survive the weather… the bitter, freezing cold and dry days of winter, the endless snow, the rain that never stops, the fog that never lifts, and/or the scorching hot summer days. You have until midnight February 12, 2009 to enter. Two random winners will be chosen from all the submissions.
I’ve put together a kit that you can purchase too: Forever Blooming Silk Flowers – Quilt Kit 14 x 18.
I would also love to see photos of your silk flower projects! You can post them to Flickr in the group SilkFlowerQuilts
Happy Quilting!
Ebony Love
I survive the oven hot summer days in Florida by:
1. staying indoors with windows open and fans on… this way the air circulates and we still get to have beautiful views of the gorgeous day outside.
2. I take cold showers!!
3. Wear almost no clothes! Tank-tops, shorts, all very light, breathable cotton clothes…. sometimes I even make my own!
Winter in OK
1. Have a sister that watches my farm and animals while I take a break.
2. Visit grandchildren in CO. Even though it is snowy in CO, my love for my grandchildren keeps me extra warm and cozy.
3. Luxuriate in the heated pool and spa at the Marriott in Colorado Springs CO. Soothing to arthritic bones in the winter.
Carol & Vanessa – you are both winners! How do you like those odds? :)
I’ll be sending an email to you both shortly requesting your mailing address. Your kits should ship within 4 days.
I love the vase of flowers. I am going to try to make one. Wouldn’t it be OK to leave off the tulle? Just remove the pins as I stitch down everything?
I am loving this!
I like to make 3 D flowers on my quilts too and have been thinking about doing this…but to see yours has really lit my fuse!
Thanks so much for the tutorial….
Allie
I love the 3D flowers you showed us. approximately what size do you recommend for the backing, and would it look ok to use this completed vase of flowers for the center of a larget quilt? I’m new at all of this and I love it! thanks, wandell
Betty: The tulle is really there to protect the edges of the flowers from fraying and to make the flowers lie flat. (They take a fairly good beating underneath the needle). I am all about rule-breaking when it comes to quilting… Experimentation is great, otherwise we’d never know what works & what doesn’t. I like the effect of the tulle, so I keep it. If you don’t want to use it… don’t! :) Let me know how it goes & take a picture!
Allie: You’re welcome!
Wandell: You can treat the silk flowers top like any other quilt top – cut the backing larger than the top so it can be trimmed after quilting & bastings. For my smaller quilts (under 20″), I usually cut the backing about 1″-2″ larger on each side. Over 20″, I cut about 2″-3″ larger (it’s harder to center a larger quilt, and heavy quilting will shrink the back a bit.
You can absolutely use the vase of flowers as the center of a larger quilt – you just have to remember the layer of tulle can be a little delicate and could tear under heavy use, but if your quilting is secure, and it’s not going to turn into a dog or cat bed, I think it would be very lovely as a quilt center.
And no matter what everyone: Please post a picture of your finished project to my Flickr group!
Love the tutorial and would love to try it! Just cold in my neighborhood but expect snow at any time.
Love keeping warm with a quilt. I have 2 that are just for that purpose.
We have wood heat that is always a plus.
Would love to join the inlaws in Texas for some warm weather. I look forward to retirement and hope a warmer climate is possible then.
.-= Rhonda Phillips’s latest post: Are you ready for a winner? =-.
Too cute!!! will definitely be trying this …
I have lots of silk autumn leaves that I want to sew on 6X6 inch squares can I hand sew the leaves onto each square or maybe a couple of leaves in each square it seem like it would be easier to do than on a machine.